I’ve been very, very busy, which is a lame excuse for the lack of posting new things, but there you have it.
Much of my work time recently has been dedicated to building inky, nebula-like effects in Houdini. Generally speaking, when you’re trying to make that whole ink-in-water effect, you dust off your copy of 3DS Max, do a quick fluid simulation, advect a bunch of particles through it, and then cache out a bazillion partitions of your simulation with different random seeds, then render in Krakatoa. Well, I have none of those things, and I needed greater control over the simulation than what can typically be achieved in Fume/Krakatoa, so I tried to do it in Houdini. I definitely have a lot of respect for the Krakatoa renderer after a week spent on this effect. This stuff is hard! Hit the jump to see exactly how I went about this…
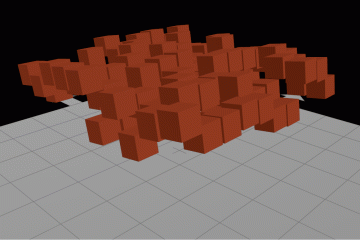
I am not really that good with the Pyro solver and handling fluid simulations in Houdini, so I thought I’d make it easier on myself and start with a particle simulation. If you want an interesting sim, you need an interesting source, so I ran a bunch of turbulent noise through a grid in a VOP SOP, and used the noise to both displace the grid and adjust the color. I then deleted all points on the grid that had smaller color values with a Delete SOP (expression was $CR < 0.8). The emitter looked like Fig. 1.

Fig. 1. The emitter geometry. You get better sims if your emitters and collision objects have interesting shapes and movements! The noise on this shape evolves over time.
Next was the actual particle sim. There were some interesting things happening here, mostly in VOP POPs. I emitted a bunch of particles from random positions on the source surface, and then applied some low-frequency curl noise to swirl things around a bit. In order to get the particles to really have the swirly appearance I wanted, though, I needed them to orbit around a center point. I guess this is what the Orbit POP is supposed to do, based on the $ORADIUS attribute that you can create, but it looked terrible and didn’t play nice with the existing Curl Noise. I needed particles to orbit faster based on their distance to the center of the nebula, like objects typically do, and I wanted things to be a little bit randomized. So, off to VOPs.
I had to create a couple things in VOPs… I needed a direction to push each particle so that it was being pushed in an orbit around the center point, and I needed a speed for each particle to move at based on distance. A vector (the direction), and a scalar. If you think about what an orbit looks like in very simple terms, you have a circle with a dot some distance from it, and the dot is moving along the tangent to that circle (see Fig. 2 for my shitty illustration). I know orbits are actually elliptical, whatever.

Fig. 2. The orbiting particle’s velocity at any point is basically the tangent of the orbit’s path.
So how exactly to get that tangent? The method is a little weird, but hopefully another terrible diagram will illustrate the point. We’re going to create an imaginary right triangle starting from the center point, where the adjacent side is the distance vector between the center point and the orbiting particle, and the opposite side is positive Y (0,1,0). Generally speaking our particles are moving along a 2-dimensional orbit, so using positive Y here is a little arbitrary but will get us the correct orbit direction along the XZ plane. The hypotenuse of the triangle here really doesn’t matter, but we can draw it in anyways just so that we can make a triangle. Now, imagine that this triangle is a polygon, and has a normal vector. Guess what? That normal is the tangent to the orbit, and so it’s the direction of motion for your particle. Take a look at Fig. 3.

Fig. 3. Drawing an imaginary right triangle from the center point, using the distance to the particle as the adjacent side, and the positive Y vector (0,1,0) as the opposite side. If you think of this as a polygon, the surface normal of the polygon is the direction we want to push the particle along each frame.
I am not particularly good with vector math… it’s something that I definitely need to take classes on because I’ve forgotten almost everything I knew about triangles and angles from trig class. Thankfully, as long as you get the concept, Houdini will do the math for you. If you have two vectors, the cross product of those two vectors is a vector perpendicular to both of the vectors. Well, the distance from our center point to the orbiting particle is a vector, and so is (0,1,0), so finding the cross product will get us the perpendicular (aka the surface normal of our imaginary triangle). This is easily done in VOPs using the Cross Product VOP, crossing P with (0,1,0).
Next, we need to scale that vector with our intended velocity based on the particle’s distance from the center. It’s easy to scale a vector… just multiply it by a scalar (a single number). First the vector needs to be normalized (turned into a unit vector, in the 0-1 range), and then multiplied by the length of the distance between the center point at the orbiting particle. There are Normalize and Length VOPs for both these functions. Then just multiply the normalized vector by the length, and we have our finalized force vector. Add this vector to the original “v” attribute of the point, and output to “v.” The VOP network looks like Fig. 4.

Fig. 4. The VOP POP network that adds orbital velocity to each particle based on distance. There’s some extra turbulence multiplied against the velocity to add randomness to the velocity amount.
After the VOP POP I added some drag and a Soft Limit POP to contain the particles within a bounding box, and then ran the simulation for a few hundred frames. I figured that I could just use a Wedge ROP to cache out this simulation 20 times using a different random seed each time, but this didn’t really work at all… the Curl Noise was evaluating the same way, and so even though the particles were being emitted randomly, they would get sucked in by the Curl Noise and all the particles would end up in the same place no matter how many times I ran the Wedge. I tried randomizing the Offset property of the Curl Noise using the Wedge, but this just smeared out the simulation. I definitely made this harder on myself by not starting with a fluid simulation and advecting particles through it, the way that you’re supposed to do this kind of effect. I needed to make a fluid.
I was too far along to build a fluid simulation from scratch, so instead I decided to just turn the original simulation into a fluid simulation… sort of. I used some black magic in DOPs to convert the particle motion into a velocity field. I have always been intimidated by DOPs, but this setup really isn’t too hard. It’s a good introduction to microsolvers.
When you’re starting a DOP simulation from scratch, you need to start with an object. In most of the shelf-made DOP simulations, you’re started with a Smoke Object, or a FLIP Object, or an RBD Object or whatever. In this case, we’re just going to start with an Empty Object. Next, we’re going to create a Vector Field and connect the output of the Empty Object to the gray input of the Vector Field. In DOPs, the gray inputs and outputs mean “objects” such as geometry or fields, and the green inputs and outputs mean “data” such as rigid body states or field visualizations. So now we have an empty object and a vector field, which is going to be our velocity field. Set the vector field’s size to match the bounding box of the simulation (mine was 50x8x50), and a division size appropriate to the scene scale (I used 0.3). The vector field’s Data Name should be set to “vel,” which is the standard name used for velocity fields in DOPs.
Next, we need visualization data, so we can see the velocity field. Create a Vector Field Visualization DOP, and connect it to the green input of the Vector Field. Turn on Show Guide Geometry, Bounding Box and Use Streamers, and then set the Plane Orientation to ZX and the Visualization Type to Speed. These settings should look familiar if you’ve ever done a Pyro, Smoke or FLIP simulation in DOPs… the Vector Field Visualization microsolver is used in all of those setups.
Now we need to bring in the particles from SOPs. This will be a lot easier if the particle sim has been cached out to disk and brought back into SOPs, if you haven’t done that already. Anyways, create a SOP Geometry DOP, and under SOP Path point to the SOP that contains the cached particles. The data name can be left as “Geometry”… this is the default name for particles or SOP geometry in DOPs. You may have to enable “Set Always” as the Default Operation on this DOP if the particle geometry isn’t being correctly imported each frame. “Set Always” means that this DOP will always evaluate every frame, instead of just setting an initial state when the object is first created and then running it through a solver for the rest of the simulation.
Now the last step– applying the particle velocities of the Geometry data to the vector field (vel) that we created. This is done using the Gas Particle to Field microsolver, which happens to be a major component of the FLIP solver (along with Gas Field to Particle). Connect the output of the SOP Geometry DOP to this new microsolver. The Destination Field should be set to “vel,” which is the name of our vector field. The Particles parameter needs to be set to the name of the particles we imported, which is called “Geometry.” The Attribute parameter wants to know which attribute of the particles is providing velocity information, which by default is “v.” Check the help docs for information on the rest of the settings, which can help optimize this step; it can take a little time to calculate for denser simulations.

Fig. 5. The visualized velocity field of the particles after running them through a Gas Particle to Field DOP. If Use Max Extrapolate Distance is on, your field will have less gaps on the inside, as the microsolver will fill in those gaps with the nearest particle information.
Playing through this sim in DOPs should give you a result similar to Fig. 5. You can adjust the Visualization Scale on the Vector Field Visualization DOP if you’re not getting a nice variety of color values on the streamers. Notice the big gaps in the velocity field? These might be a problem later on when you’re advecting particles, so it could be a good idea to enable Use Max Extrapolate Distance on the Gas Particle to Field DOP. You’ll see those holes get filled in with particle information from particles nearest the empty voxels, based on the extrapolation settings on the microsolver.
Next, this fancy new velocity field has to be stored to disk. Back in SOPs, create a DOP Import Fields SOP. The DOP Network should be set to the name of your DOP network, and the DOP Node is the Empty Object you started the simulation with (this object will include all of your field data added later in the simulation). Then under the Import tab, create one field to import, and set the field to “vel.” You can leave the Object field blank. Then connect this to a ROP Output Driver, and export the field to a .bgeo sequence somewhere. Then bring the exported .bgeo back into SOPs using a File SOP.
That’s what I got for being lazy and trying to do the simulation with particles instead of starting with a fluid… I ended up having to convert the damn thing into velocity fields anyways. Now I just had to make another POP simulation using the same emitter, but this time with an Advect by Volumes POP applied after the Source POP. The Velocity Volumes had to be set to the File SOP importing the velocity field, and the Velocity Group was “@name=vel.*” (this expression just means grab any object whose name starts with “vel,” so vel.x vel.y and vel.z). I used the Update Position advection type, since I just wanted all my particles to start moving with the velocity field as quickly as possible. This is fairly similar to what the particle advection operator in Max’s Particle Flow does, when you’re advecting particles through a Fume simulation. Next, I applied some more Curl Noise, with the advection type set to Update Velocity. Velocity Blend was set to the default 0.5, and Velocity Add was 0.056… a very small amount of added movement, just enough to randomize the particle motion a little bit on top of the velocity field advection. Then some drag to keep everything under control.
Once I was sure the simulation looked good, it was time to export a bajillion particles. The standard workflow is to create a Wedge ROP, set the Wedge Method to “By Channel,” turn off Random Samples, and then add one Wedge Parameter. Set the name to “seed” and the channel to the path to your POP network’s “seed” channel (something like /obj/particles/popnet1/seed), and set the range from 1 to however many partitions you want. Then set the Number of Steps to be equal to your end range. I used 30 partitions, each with about a million particles by the end, for a total of 30 million particles. Every time the Wedge ROP evaluates, it will take a step forward within the range you specified, set the channel you picked to that value, and then render. So in my case, I ran the simulation 30 times, with a random seed on the POP network set from 1 to 30 for each partition. Next, I created a Geometry ROP, and set the Output File to “$HIP/bgeo/partitions/particles_$WEDGE.$F.bgeo”. The $WEDGE variable just writes out the partition number, so the files for each partition won’t overwrite each other. I set the Wedge ROP’s Output Driver to the path to the Geometry ROP, and then rendered.
WARNING: Partitioning millions of particles this way takes a very long time, and a TON of disk space. My cache of about 30 million particles took up well over half a terabyte of disk space. I hope you have some spare hard drives.
Once this process was done, the next step was to load all of these partitions back into Houdini for rendering. Houdini would implode if you tried to load in 30 million particles using File ROPs, so the standard workflow here is to use the Delayed Load Procedural to make Mantra load all the particles only at render time. This procedural is a shader, so it lives in the SHOP context. I created a Delayed Load Procedural SHOP, then set the file to one of the sequences that I output. Then I replaced the seed number of the partition in the file name (again, 1 through 30) with the expression ” `opdigits($OS)` “. opdigits() will return any numbers that are part of the given operator; $OS returns the name of the operator the expression lives on, so in this case, if my procedural shader node is named “vm_geo_file1” then opdigits($OS) will return “1”. This way, I can just duplicate the procedural 30 times, and each duplicate, if named correctly (vm_geo_file2, vm_geo_file3, etc) will point to the correct partition seed. Then I set Motion Blur Style to “Set Explicitly” and enabled Use Velocity Motion Blur, so that Mantra would use the “v” attribute of each particle to determine motion blur. This helped smooth out the render a bit.
The last step was to create dummy geometry to load each procedural. I created a subnet in SOPs, and created one geometry container for each partition. Under the Render > Geometry tab, I set the Procedural Shader for each container to point to one of the Delayed Load Procedurals, and then assigned a material under the Material tab. I won’t go into shading for this post; I’ve already typed out way too much. I can post the shading network later if anyone is interested. The only other step was to enable point rendering under the Geometry tab by setting Render As Points to “Render Only Points.”
My result, after a week of research and poking around with materials, was this:
The color differences are based on a “density” attribute that I created in the particle simulation, which used a point cloud lookup inside a VOP SOP to look for the number of nearby points within a certain radius of each point, and map that density to a 0-1 range which could then be used to drive a Ramp Parameter in shading. This took a VERY long time to evaluate, especially when I was cranking out a huge number of particles. I tried doing this step inside the material instead of spending the time to cache out the density value, but it was so incredibly slow to render that I figured it was best to just do all of the calculations with the partitioning.
One last thing: Point rendering in Houdini determines the size of each rendered point with the $PSCALE attribute. Unlike other point renderers which will always render each point as an infinitely small point, Houdini renders each point as a disc with the size based on $PSCALE. This was a big problem with this nebula, because the points nearer the camera were visibly larger than points farther away, breaking the illusion that this was an enormous cloud of gas and dust. The solution was to determine $PSCALE based on each point’s distance from the camera. This can be done using a UV Texture SOP: Set the Texture Type to “Perspective from Camera”, and the Camera to whatever camera you plan to render from. Apply the texture to Point texture (not the default Vertex texture). Then append a Point SOP, under the Particle tab choose “Add Scale,” and set the scale to be $MAPW (multiplied by a constant, whatever the appropriate scale is for your scene). $MAPW is basically the distance from the camera to the particle when using perspective texture mapping, so it’s a quick and cheap way of scaling the points to be the same no matter the distance from the camera. Keep in mind that this $PSCALE value is cached along with the partitions, and as far as I know there is no way of modifying the $PSCALE after caching without actually re-processing each partition in SOPs. If anyone out there knows of a way to do this in SHOPs, please tell me about it! It took forever to get the $PSCALE just the right size for my simulation, considering I had to re-partition every single time I wanted to adjust it. Once again, props to the guys who wrote Krakatoa for making point rendering so easy… I love Houdini but sometimes it can be very, very difficult to do simple things.