I ran into a problem recently where I was trying to make some nice-looking embers in houdini, complete with nice motion-blurred trails. Typically with a particle system you use the velocity attribute to handle motion blur, but geometry velocity blur is always linear, so your motion trails will always be perfectly straight even if you have nice squiggly motions with your embers.
Deformation motion blur looks great, but in most simulations particles are being born and dying all the time, and deformation motion blur doesn’t work with a changing point count.
The solution is to force a constant point count. This can be problematic when your particles need to have a lifespan, so there are a few little tricks you’re going to have to pull in order to make this work…
Forcing the constant point count means that we’re going to create a fixed number of points each frame equal to the maximum number of particles found in the simulation, and then cycle through every point and match it to a particle if that particle exists. If the particle doesn’t exist, the point hides at the origin (or another specified point if you want) with an alpha of zero. The particles are matched by id, so each point that’s substituted in should accurately inherit the properties of the original simulation.
To create the points, drop an Add SOP and create a single point at the origin. Then pipe this into a Copy SOP that’s creating a number of copies equal to the highest “id” attribute of your simulation. Next, assign an Alpha of 0 and a unique id attribute to each point you created using a Point Wrangle SOP. The VEX code looks like this:
@Alpha = 0;

@id = @ptnum;
As far as the original particle sim goes, there’s nothing hugely interesting; I have some short-lived particles being generated from a circle, I give them some strong upward and slightly outward force, and run them through some curl noise. I’m writing the particles to disk, then loading and running them through a VOP SOP that divides each particle’s age by its lifespan and uses this to drive two ramps: one for color, one for alpha. This way my particles can fade in and out over time like embers.
Now the important part: the VOP SOP to transfer point data. The output of the Point Wrangle SOP goes into the first input of the VOP SOP, and the particle sim goes into the second.
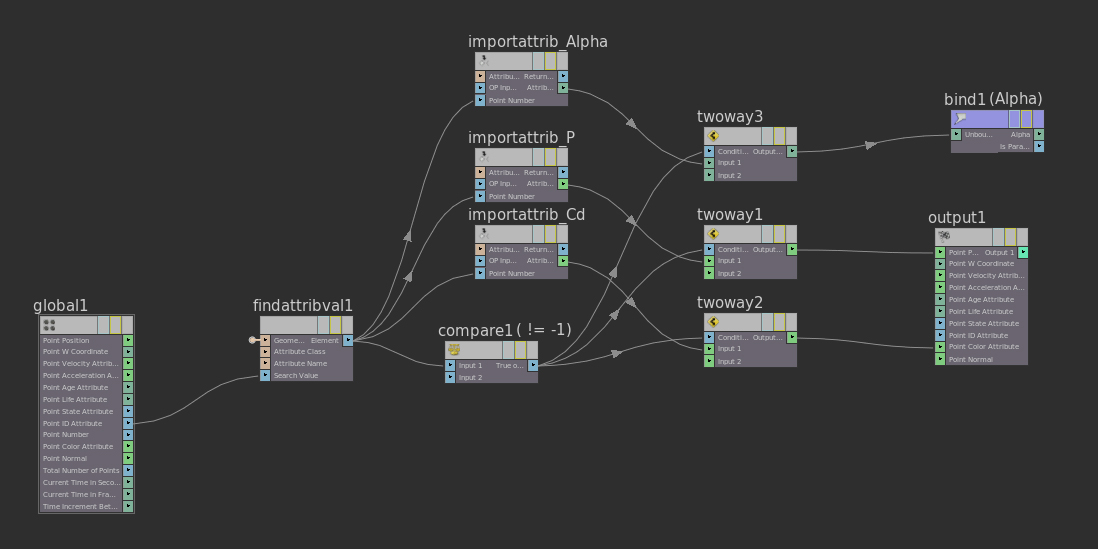
The network for the VOP SOP to transfer point data.
The central VOP here is the Find Attribute Value VOP, which will return the first point found in a point cloud with a given attribute and value. In this case we’re going to take the Point ID attribute of each copied point and search the particle system for a point with a matching ID. Connect the Point ID Attribute from the Globals VOP to the Search Value of a Find Attribute Value VOP, then type in “id” as the attribute to search. The Geometry File parameter should be promoted and set to this expression: op:`opinputpath(".",1)` This automatically fills in the parameter with the name of the particle system that’s connected to input 1 (the second from the left) of the VOP SOP.
If the Find Attribute Value VOP finds a matching point, it will return the point number with the matching ID. If it finds nothing, it returns -1. So we’ll see if we get a value that’s not -1, and if so, we’ll import all the attributes we need from the particles and bind them to our copied points.
Drop down a Compare VOP and connect the output of the Find Attribute Value VOP to Input 1 of the Compare VOP. Input 2 should be set to -1, and the Test is Not Equal (!=). We’ll also connect a few Import Attribute VOPs to the output of the Find Attribute Value VOP via Point Number. We’ll import Alpha, P and Cd here, but you could also import orient, rot, up, or any other attributes important to your simulation. The OP Input Index of each VOP should be 1, referring to the particle system connected to input 1 of the VOP SOP.
Next we drop a Two-Way Switch for each attribute we’re importing. The output of the Compare VOP connects to the Condition of each switch. If the Compare VOP outputs True, we use Input 1 of each switch, which means we’ll import attributes. Input 2 is left blank, meaning that if we don’t find a particle with a matching ID, we leave the point at the origin with its default Alpha of zero. Connect the output of each Import Attribute VOP to the Input 1 of each switch. Then just connect the output of each switch to the appropriate slot of the Output VOP, or use a Bind Export VOP for anything not listed on the Output (like Alpha).
After this, you can either render the particles directly or use a Copy SOP to copy geometry to the points. Make sure any points directly inherit point color and alpha (enable Use Template Point Attributes and move Alpha from “Mult” to “Set”).
Now we actually get to the problem of rendering. If your motion doesn’t need to be INCREDIBLY accurate, you can drop down a Time Blend SOP immediately after the File SOP loading your particle system and this will fill in the space between frames for nice smooth motion blur. Make a Mantra ROP and under the Sampling tab, enable Allow Motion Blur. You can adjust Geo Time Samples here on the ROP, or you can go to the geometry node that your particles live in and add the same rendering property (geo_motionsamples) directly to the node to fine-tune it. The more samples you use, the smoother the trails will be. You then have to select your camera and crank up the shutter time; the number you choose depends on the speed of your simulation. Higher numbers = longer trails.
If your motion does need to be accurate, things become a little more difficult. You will need to cache out substeps for your particle simulation by setting the Increment to something like 0.25 (depending on how many substeps you want). I don’t like writing out frames with decimal places in them, especially because Houdini sometimes gets confused by this, so for the Output File in place of $F I use this expression: `pythonexprs('int(hou.frame()*100)')`
This gets the current frame as a floating point, multiplies it by 100 and converts it to an integer for your frame number. You’ll have to use the same expression in your File node to read the frames back in. In this case, you won’t use a Time Blend, since you have accurately calculated subframe motion and the Time Blend would ruin this. The catch here is that you aren’t going to have the smoothest motion trails unless you have a LOT of subframes cached.
The other downside to this method is that your geometry time samples are limited to the number of subframes cached, minus 1. So if you were caching at an increment of 0.25 (four substeps), your geometry time samples can reach a maximum of 3. Any higher than this and you’ll notice crazy motion trails streaking back to the origin. I’m assuming this is because your points are actually being repositioned from the origin at every frame. There is probably a better way to prevent this from happening, maybe a Solver SOP or a more clever way to transfer attributes, but I haven’t figured it out yet.

Check out that red dot at the bottom center. The points there SHOULD be completely invisible, but there’s still something there that I can’t quite get rid of yet.
Related to this same problem, you may sometimes notice faint motion trails streaking back to the origin, or points rendering at the origin even though their alpha should be zero. I haven’t yet figured out how to solve this problem, since the particles SHOULD have an alpha of zero from the ramp parameters I created long before they are reset back to the origin. Sometimes there is a faint red streak visible leading away from this point, from when particles “die” and are thrown back to the origin. If I can figure out what’s causing this I’ll post a follow-up, although for now this is easy enough to paint out for the most part.
Here’s a HIP file if you’d like to mess around with the setup. Don’t forget that the particles need to be written to disk before you can get any kind of accurate motion blur with either method listed above. Particle Motion Blur HIP