I’m working on a production right now that involves sending absolutely enormous animated meshes (6.5 million polygons on average with a changing point count every frame) out of Houdini and into Maya for rendering. Normally it would be best to just render everything directly out of Houdini, but sometimes you don’t have as many Houdini licenses (or artists) as you’d like so you have to make do with what you have.
If the mesh were smaller, or at least not animated, I’d consider using the Alembic format since V-Ray can render it directly as a VRayProxy, but for a mesh this dense animating over a long sequence, the file sizes would be impossibly huge since Alembics can’t be output as sequences. Trying to load an 0.5 TB Alembic over a small file server between 20 machines trying to render the sequence and you can see why Alembic might not be ideal for this kind of situation.
Hit the jump below to see the solution.
Fortunately, there is a way. There is a command line utility that comes with V-Ray called ply2vrmesh which can convert several common geometry formats into V-Ray native .vrmesh format, which can then be loaded into your scene as a VRayProxy. The only trick is that ply2vrmesh only recognizes an older version of the .bgeo format. To write this old format out of Houdini, use a Geometry ROP or a ROP Output Driver and set the file extension to .bhclassic. Ply2vrmesh doesn’t like the .bhclassic extension, however, and so you’ll need to change the file extension manually to .bgeo after writing the files from Houdini. You could easily do this with a Python script or whatever file renaming utility you have around. (You don’t actually have to change the file extension to anything other than .bhclassic, confirmed.) Once you have the .vrmesh written, just load it into a VRayProxy like you normally would.
There’s more! Ply2vrmesh recognizes point attributes on your mesh, including Cd, v, uv, and any arbitrary vector or float channels you happen to have on the mesh. You can access these attributes with a VRayVertexColors node by setting the node’s Type to “Set Index”, and then changing the Set Index slider. As far as I can tell there’s no way to reference a color set by name, so you have to reference the channels by index. If you watch the output of ply2vrmesh, it will tell you which vertex color channels go to the different indices, which start at 1 (not 0!). Be aware that some channels like v aren’t visible in the conversion process, although if you include a Velocity pass it will correctly use the v attribute.
The .vrmesh format also has the bonus advantage of being tiled so that only the necessary parts of the mesh are loaded into the scene at render time. This means way less memory and network overhead when rendering extremely dense meshes. The 6.5 million-polygon mesh shown below rendered in just over two minutes on my system at 960×540, and the total conversion time to the .vrmesh format was 1 minute, 23 seconds. (The blotches visible on the mesh are because I forgot to adjust the number of samples for the attribute transfer at the end of my Houdini SOP chain… sorry not sorry)
-
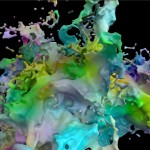
- Splash mesh, color index 1.
-
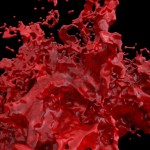
- Splash mesh, color index 2.
-
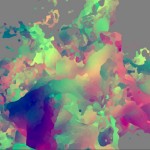
- Splash mesh velocity pass.
There’s a couple of command line options for ply2vrmesh you should be aware of. Sometimes you’ll load a mesh in and the normals will seem wrong during rendering… this could be flipped vertex normals, or flipped face normals. The -flipFaceNormals and -flipVertexNormals flags will deal with this during conversion. Also, if you want V-Ray to read the UV channel correctly, you should explicitly define the UV channel as channel 0 using this flag: -mapChannel 0. Otherwise V-Ray could potentially read your UVs from Houdini as a vector color channel, which is not incredibly useful.
If you have multiple UV channels that you need to access, it’s possible to do so by creating V-Ray user attributes on your 2D/3D placement nodes. The only catch here is that the channels are not going to inherit the original channel names… for some reason they will be renamed to “uvmap1,” “uvmap2,” and so on. If you select your proxy and load the UV Texture Editor, you can see the map names that are created even if you can’t see the UVs themselves. If you add the user attribute to your placement node and type in the name of one of those sets as the “UV set name,” it will correctly use that UV set for placement. (The attribute is a string type attribute called “vrayUVSetName.”)
2 Comments
tomfreitag · 02/16/2015 at 11:29
thanks, great blog!! .I used ply2vrmesh very often between houdini -> max. I am using the obj format. Your information about attribute is great. thanks!
What I also love with seqs: its only one file and its much smaller (compression?) than the hole seq.
tom
Christopher James Ford · 02/17/2015 at 09:06
Yeah thanks so much for this info.
I was doing a similar thing for converting particles through partio, saving to bhclassic instead, but never thought about doing it with ply2vrmesh was going to obj first. Amazing to get all that data across via vertex colours thanks a ton.
Comments are closed.