As promised, a useful post! And probably a long one.
As far as rendering goes, the problem that I see people running into more often than anything else is render layers mysteriously breaking, especially when file referencing is involved. The symptoms are typically either objects disappearing or Maya simply being unwilling to switch to a specific render layer, claiming in the Script Editor that there are “overrides to a node in a missing reference” or something to that effect. A lot of less experienced or just less technical types will try to solve the problem by either importing their references into the scene (which is rarely a good idea), or by screaming obscenities (which is exhilarating but ineffective). There is a better way to get your scene to render with no problems, and be able to use file referencing. The trick is to use shared render layers properly, only allow certain edits to your references in your final scene, and make sure that your references are clean.
File Referencing
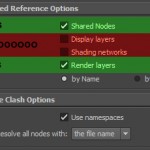
If you want your references to all work properly in the final scene, you need to build all of the render layers and do all the shading work in the reference itself, IN ADDITION TO the final render scene. Then when creating your file reference, turn on Shared Nodes and Share Render Layers By Name. Only share render layers! Sharing display layers usually isn’t an issue, but sharing shading networks often leads to scenes crashing, especially in very dense scenes. In order for the render layer sharing to work, you also need to make sure that all of your assets that you want to merge together in the final scene have exactly the same set of render layers. Do all the render layer assignment and shading assignment inside the referenced files themselves.
More often than not, your render layers are breaking in your final scene because of component shading or because of shading edits (either changes to an object’s shader assignment or to a render layer assignment). Maya keeps a record of every change made to a reference once it’s brought into a scene; you can view this by selected a reference in the Reference Editor and going to File > List Reference Edits. This is fine for setting attributes or doing some animation, but rewiring shading networks and render layer sets will add a ton of edits to this list, and in some cases add even more edits each time you switch render layers. Component shading (more on this in a second) adds an absolute shitload of these. Maya will eventually get confused when you’re switching render layers and simply be unable to keep up, and that’s the big reason why you’ll see the dreaded “Connection not made” error in the Script Editor.
To avoid filling up your scene with reference edits, just don’t reassign shaders to objects or objects to render layers in your final scene! Do this in the original file itself. It might seem like more work in the short term, but it will keep your scene clean AND you won’t lose the shading assignments you made because they’re in the original file, not the render scene. If your scene does end up breaking, the first thing to try is to list your reference edits for the reference that’s mentioned in the error and use the filter to search for “*dagSet*”. This will list all shading-related edits that have been made in this scene. Unload the reference, highlight these edits, and then remove them. Then reload the reference. If you don’t mind losing ALL of your reference edits instead of just shading edits, you can also just unload all your references, select them, and run Clean Up Reference. This will remove all edits you made, and it’s not undoable, so save first.
If doing this for any assets that are reporting errors doesn’t work, or your scene keeps breaking in short order, then you might just have broken assets.
Clean Assets
By far the most common reason for a referenced asset to break render layers is COMPONENT SHADING. If you’ve ever tried to “Select All Objects With Material” in the Hypershade and noticed that some objects are highlighted as whole polygon meshes and others as faces (even if all the faces belong to only one object), that’s component shading at work. If a mesh has per-face shading connections, it WILL break your render layers, it’s just a matter of when. Component shading is always a really really terrible idea, but sometimes it happens to your scenes even if you don’t intend it to, mainly when combining two polygon objects together.
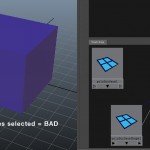
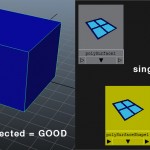
If you try creating two polygon objects, assigning the same shader to both, and then combining them (you can even delete history after if you want), then select the shader in the Hypershade and run Select Objects With Material, you’ll see that the new object’s faces are highlighted, rather than the entire object as a whole. This is bad. Even if you assign a different material to the object as a whole, it will retain per-face shading connections! Graphing the mesh in the Hypershade, you’ll see two connections- one green and one blue- between the mesh and the shading group. This tells you that the object has per-face set connections. Delete these connections and the object no longer has a material connection; it’ll appear as an empty wireframe in the viewport. Assign a new material now, and you’ll see one single pink connection- this is a clean shading connection applied to the mesh as a whole.
Doing this manually for a large number of objects is a HUGE pain in the ass, and for that I’ve written a Python script: hfFixShading.py (right-click > Save As). To check for bad shading, put the script in your Python scripts folder, and first import by running:
import hfFixShading as hfFS
Then check your scene by running:
hfFS.hfCheckShading()
If the script finds objects with component shading, it will highlight them for you. To clean them up, you can decide to either split objects into separate meshes based on shading assignment, or just fix bad shading connections (for objects like the above example). These commands are run like this:
hfFS.hfSplitByShader()
hfFS.hfFixBadShading()
There are other things besides component shading that can cause your assets to break render layers in the final scene… layer overrides in an asset can cause problems, as can hidden render layers in a scene… if you referenced a file into your asset, and then imported it, any merged render layers will be hidden but they’re still in your scene! Look in your Outliner for duplicate render layers (turn off “Show DAG Only” in the Outliner). Namespaces in your asset files can also cause problems and it’s best not to have any.
So many things to break. This is just a fraction of what can make your scene explode, but it’s what I’ve run into most often. I’ll post more about this later.


6 Comments
ray · 07/05/2011 at 04:36
good read, thanks for the script too!
Matt Rosenfeld · 07/07/2011 at 16:08
Interesting approach, and cool script. I think the best solution would be for autodesk to take the render partitions from Softimage and put them in Maya. Softimage partitions work great with references. That way the problem is solved. The problem is that these layers have been buggy since their inception due to many factors, one being that overrides are unique to each object, or node Maya gets confused because 30 lights all have an override that say “make me red.” In Softimage you put those lights into a folder (partition) with one override/overrides that control everything in that partition. So, there’s one override in the folder that says “make me red” and all lights reference that one override and do what it says. Most big studios just write their own tool, which is why Autodesk feels no sense of urgency to fix this. It’s also why they don’t care if Mental Ray or Maya Software renderers work.
toadstorm · 07/07/2011 at 18:06
yeah, i wish that i had a more constructive approach in dealing with overrides, but without completely rewriting the render layer system the “blow everything up” method seems like the best option. i’ve never used softimage but the “partition” system seems nice…
Matt Rosenfeld · 07/08/2011 at 12:26
Yeah, the best solution is to rebuild it, or create a node-based plugin which would essentially replace the current system. Sony’s Katana, which the Foundry will be releasing soon, has a great method where stuff never breaks because it can’t. In the meantime, I wish Autodesk would just implement the Softimage method, since they own it. Currently, they seem to be concentrating on breaking all of the modeling tools:)
banaltheory · 08/13/2011 at 23:27
Hey Toadstorm, the python script seems to be missing? goes to an internal server error page.
toadstorm · 08/16/2011 at 01:55
did you try right-click > save as? the server is interpreting the .py script as something to run from the web server, which is why you get the weird error. you need to save the script instead of running it.
Comments are closed.