An updated version of this article is now available here: https://www.toadstorm.com/blog/?p=942
On the Houdini Discord server(s) I keep seeing the same kinds of questions over and over again, mostly related to instancing. The most common questions asked seem to be:
“How do I randomly rotate/scale my copies?”
“How do I rotate each copy along a specific axis?”
“How do I randomly change what objects get instanced?”
“Why am I not supposed to copy stamp anymore?”
Houdini’s documentation can admittedly be a little vague at times, but more importantly they expect you to have a decent understanding of how some fundamentals of computer graphics work, like how a 3×3 matrix works for orientation. I’m admittedly not great at math, so hopefully I can explain everything both intuitively and in such a way that I don’t completely embarrass myself in front of people who actually know what they’re talking about (i.e. this guy).
Anyways. The Copy SOP.
One of the first things to learn about the Copy SOP is that the point attributes on the points you’re templating to can influence how each copy is placed in the world. Aside from the obvious position of each point, P, there are a few other attributes with obvious effects. You can view the complete list here: http://www.sidefx.com/docs/houdini/copy/instanceattrs The important ones to remember are:
v@Nandv@up(these vectors work together, explained later)f@pscale(uniform scale of each copy)v@scale(a vector that can scale each axis independently)p@orient(a QUATERNION that defines the orientation of each copyp@rot(another quaternion that defines an additional rotation)
(Keep in mind that those little @ prefixes in front of the attribute names are only used in Wrangle nodes… they’re just there to hint to Houdini what attribute type they are. For common attributes you typically don’t need to include them in your Wrangles, and you never need to use them when writing group masks.)
Now, in many situations, you can get by with just using the Attribute Randomize SOP to randomly generate an N attribute for you, and a random float for pscale, and you’re good to go. But there’s always going to be times where you need specific orientations for copies, and these times are when you’ll need a more thorough understanding of what the Copy SOP is doing under the hood…
Orienting Copies
First things first. The Copy SOP assumes that your object to be copied is aligned to the +Z axis. This typically means that your objects are going to need to be rotated 90 degrees on the X axis if they’re aligned the usual way, standing up along the Y axis and facing towards Z. Here’s a little gif to show you the typical alignment vs the correct alignment:
Objects going into a copy SOP must be oriented to +Z.
Next, some template point attributes. There are easy attributes to use, like pscale, which uniformly scales each copy, but here we’re going to go into some of the trickier ones. Typically you don’t want all of your copies oriented the same way. The simplest way to control orientation is provide two vector attributes on your template points: N and up. If Houdini finds these attributes, it will try to orient each copy so that its Z-axis points towards N, and its Y-axis points towards up. Note that you can sometimes get away with only providing N, but you might get unpredictable results.
Edit: Something worth noting here is the dihedral() VEX function. If you only provide an N attribute to the Copy SOP, Houdini has to guess what your up vector might be in order to build a complete orientation matrix. It does this by calculating the rotation necessary to rotate the world Z-axis onto your N vector, and then applying that same rotation to the Y-axis to figure out the up vector. The dihedral() function does exactly this… given two vectors, it computes the rotation matrix necessary to get from one to the other.
What’s happening internally here is that Houdini is constructing an orientation matrix, or a matrix3 in Houdini terms. It’s easiest to think of this orientation matrix as being your old pal, the origin gnomon: 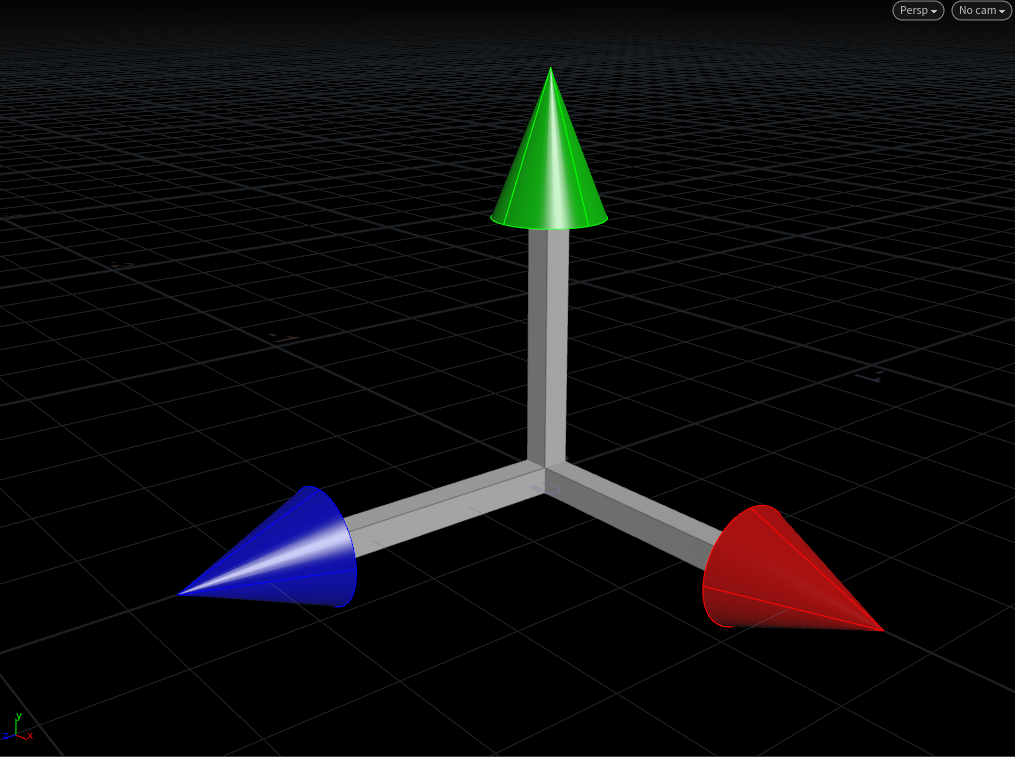
Basically, the matrix is telling you which way is up, right, and forward. It’s a 3×3 matrix because it’s made up of three unit vectors. The neat thing about 3×3 matrices is that if you multiply vectors by them (such as point positions or velocities), you can change their direction. This is how we rotate objects in CG. The origin gnomon, pointing along all three world axes like you’d expect, is related to what is called the identity matrix, which simply says “up is up, right is right, forward is forward.” If you multiply a vector by the identity matrix, you’re essentially saying “do nothing.”
N and up are two of those axes; +Z and +Y, respectively. The third axis can be inferred by computing the cross product of the other two axes. The cross product gives you a vector that’s orthogonal to both the other vectors, meaning it’s perpendicular to both of them. So, by providing N and up to the Copy SOP, we can compute a 3×3 matrix that determines the orientation of each copy. Great!
Well, sort of.
The problem with using N and up is that it’s not the most stable way to orient something. If you’ve ever seen an aim constraint start flipping out at particular angles, or instances start wobbling or spinning out of control during a deformation, you’ve run into this problem. Take a look at the instances on this deforming mesh:
Copies on a deforming sphere, oriented with a 3×3 matrix. Note how they sometimes flip around.
Now let’s contrast that with a slightly spookier method of orienting things, the quaternion:
The same movement, using quaternions for orientation. Note how the copies are much more stable.
I’m not very good at math, and quaternions are some serious wizard shit, but in the simplest possible terms, quaternions are a convenient way of describing a rotation about a particular axis. Thankfully, in Houdini, you really don’t need to understand them all that well in order to use them to orient copies (for the most part). A matrix3 can easily be converted to a quaternion (these are of type vector4 in Houdini) using the VEX quaternion() function. Quaternions themselves can easily be blended from one to the next using slerp(), or spherical linear interpolation. Quaternions are used all over computer graphics, especially in video game engines due to their ability to predictably rotate vectors.
Edit: Quaternions are great for interpolating (slerping) between rotations, but it was a bit of a stretch to say they’re inherently more stable. It’s more that when you compute a matrix out of N and up on the fly, you’re relying on cross-multiplying those two vectors to compute a matrix3 out of thin air on every frame, independently of any previous frame. That said, I’d still lean on them when possible because except for some problems interpolating quaternions with the primuv() function, they’re way easier to deal with and rotate between than matrices are.
Let’s start with a really simple example: we’re going to create a 3×3 matrix ourselves, and rotate it about an axis. Then we’re going to use that matrix to rotate our little gnomon buddy.
Our point wrangle code for rotating this geometry (or any old geometry at the origin) looks like this:
// create a default "identity" matrix, meaning no rotation
matrix3 m = ident();

// rotate this matrix around the given axis
vector axis = chv("axis"); // setting this to {0,1,0}
float amount = radians(ch("angle")) // setting this to @Frame;
rotate(m, amount, axis);

// multiply each point by this new matrix to rotate the object.
// note that the pivot needs to be at the origin for this to
// rotate in-place.
@P *= m;
If we run this, the object should just sit and spin slowly. Easy enough, right? We create an identity matrix (again, this means “change nothing”), define an axis and an angle, then rotate the matrix using those values. Once the matrix is rotated, all we have to do is multiply our point positions by this matrix (remember, position is a vector relative to the origin/parent), and the shape rotates:
Multiplying the point positions by a 3×3 matrix that’s rotating, rotates the whole shape.
Now let’s use this to orient copies, but with quaternions. It looks very similar, but we’re going to construct that initial matrix a little differently before we start rotating it. Let’s say we have a pig head (the best test geometry) with scattered points all over it, and we want our copied gnomons to spin relative to the inherited N attribute from the pig head. We need to make sure each matrix, then, is oriented to that N, along with an up vector for stability. Here’s what the code would look like:
v@up = chv("up_vector"); // setting this to {0,1,0}

// create a 3x3 orientation matrix using N and up as
// the principal axes.
matrix3 m = maketransform(@N, v@up);

// now rotate this matrix around the N axis over time.
vector axis = @N;
float angle = radians(ch("angle"));
rotate(m, angle, axis);

// make the orient quaternion from this matrix.
// the copy SOP reads this automatically.
p@orient = quaternion(m);
The maketransform() function used here instead of ident() means our starting matrix is already pointing the way we want it to be before we start rotating. We define an axis and angle, exactly as before, and spin that matrix around. The last step is just converting the matrix to a quaternion and naming it @orient, which the Copy SOP knows to read. The output result looks like this:
“Pig Head With Spinning Gnomons.” Digital, 2017.
Okay, time for a break.

Alright, break’s over. Now to answer those second two questions… how to vary the objects copied per-point, and how to do it without copy stamping?
Randomizing Instances
The long answer is provided by Jeff Wagner from SideFX here: https://vimeo.com/213127548
But if you don’t want to sit around for an hour watching that video, I have a shorter and less-informed explanation for you all. The first point to take home here is that copy stamping is dead. The option is still there for you, but you just shouldn’t use it. Copy stamping is very slow and doesn’t scale well at all with lots of copies, and it can’t be compiled either (more on that later). So just don’t do it. The second point is that the copy stamping functionality can be rebuilt in a slightly different way using For-Each blocks, and Spare Inputs.
Spare Inputs are a relatively new trick that allows for some pretty amazing performance tweaks, and occasionally more readable networks. On a SOP’s Parameters window, you can click the little gear icon and select “Add Spare Input.” This creates a new string-type input that can point to any upstream SOP. Once a SOP is connected, you’ll see a little purple line connecting the target SOP to your current one, as a hint that there’s now a spare connection between them.
Now that you have this spare input, you can easily run Hscript expressions that reference the spare input’s attributes, by referring to the input as a negative number. The first spare input you create, Spare Input 0, can be (somewhat counter-intuitively) referred to in an Hscript expression as -1. So to grab P.y from point 0 of spare input 0, we could use the expression:
point(-1, "P", 0, 1)
We’re going to use this spare input magic first to drive a Switch SOP inside a for-each loop, to switch what geometry gets copied to each point. Connect three different shapes into a Switch SOP, then create some points and give them a random integer attribute named index (this name is arbitrary) with a value between 0 and 2. Now create the For-Each block, and set the Iteration Method to “By Pieces or Points.” Make sure the Block Begin is set to “Fetch Piece or Point.” Append this Block Begin to your template points. Our loop will run once per point, discarding all other points during each iteration, then merging everything back together again at the end. This means that during each loop, there’s only one point, and that point is point 0. Connect the output of the For-Each Start to a Copy To Points SOP’s template points (2nd) input, and the Switch to the 1st input. Then output the Copy to Points to the Block End.
Now, the fun part. Select the Switch SOP, click the gear icon, and Add Spare Input. Point the spare input to the Block Begin SOP’s path, e.g. ../foreach_begin1. You should see a dark purple line appear, connecting the Block Begin to your Switch. We want the Switch to select a geometry type based on the index attribute we created, so use this expression for the “Select Input” parameter:
point(-1,0,"index",0)
Your network should look something like this: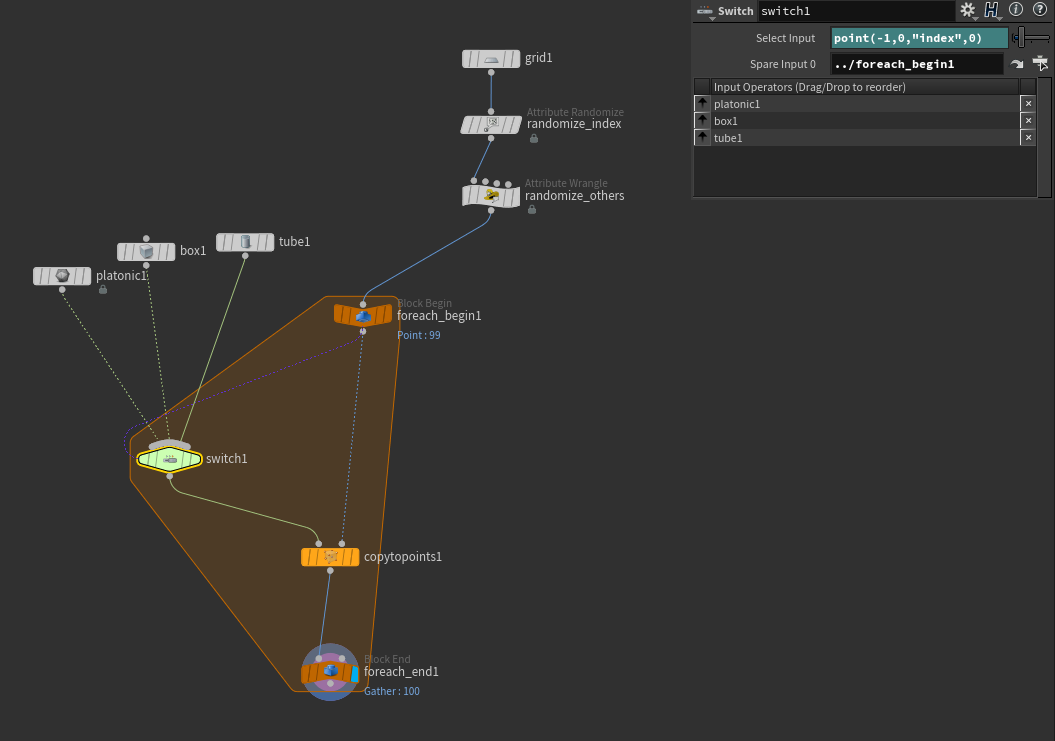
The final output should have a randomly-chosen object positioned at each template point. Hooray!
Now let’s get weird.
One of the other things that the Spare Input feature helps us to do, is to Compile groups of SOPs into a single operation, which can dramatically speed up cooking. For-Each loops inside Compile blocks can be multithreaded, which can mean a hell of a lot when you’re making hundreds of thousands of copies. These things are a little tricky to set up, but if done correctly can get you home in time for dinner.
Compile blocks, for technical reasons, require that anything going into the block is “static,” meaning they are the same for every operation. This means no upstream stamping (but you shouldn’t be stamping anyways), and it also means explicitly defining all of your inputs in expressions by using Spare Inputs. It also means a few other strange things that you’re better off listening to Jeff explain in his video above. The big thing to remember here is that you have no control over individual operations inside the Compile block… everything in there is turned to mush, so all operations have to be running on known quantities (your inputs).
We’re going to start with a pretty similar network, but with a LOT more points this time. We’ll need a separate Block Start node for each input shape going into the For-Each. You can create these by just copy-pasting the existing Block Start and setting the Method to “Fetch Input.” Each of these Fetch Inputs then connects down to the Switch SOP. We do this to help the Compile block understand what its exact inputs are. Next, create a Compiled Block, and start it right before the original Block Start, ending it right after the Block End so that the entire For Loop is encapsulated. You’ll see the yellow Compile convex hull eating up way more of your network than you intended, and since some of those nodes likely will not compile, the operation will fail.
The key to solving this is again in explicitly defining our inputs to the Compile Block. Select the Compile Block Begin node and duplicate it three times, once for each input, then wire them in between the original shapes and the For-Each Block Start nodes. The convex hull should now only be compiling the For-Each block, and nothing outside. Your network should look something like this:
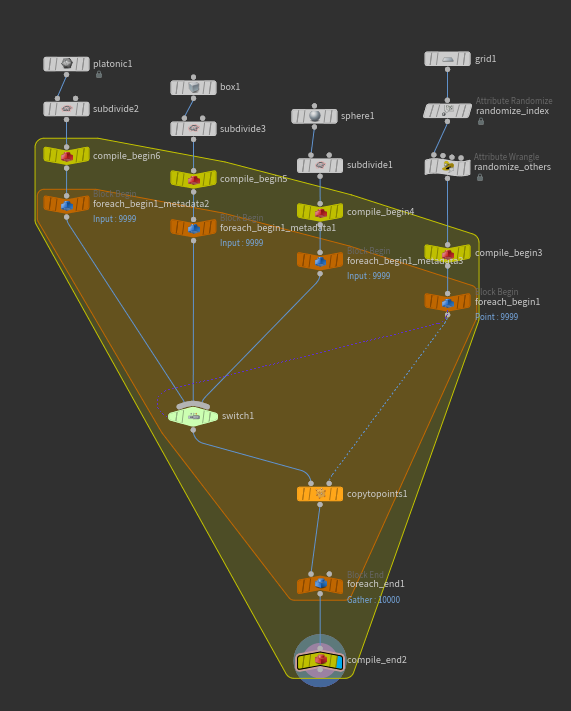
The compiled For-Each loop.
If you set your display flag on the end of the compile block and don’t see a big red symbol, congratulations! Your block compiled. To get the full speed boost, though, you need to tell your For-Each block to “Multithread When Compiled,” which is a checkbox on the Block End node. Check out the cook times before and after compiling and multithreading… for large numbers of copies, you could be saving minutes per cook.
Manipulating Packed Disk Primitives
There’s another neat trick you can use to very quickly manipulate what objects are copied to what points, and it involves using Packed Disk Primitives. Packed Disk Primitives are just references to geometry (such as .bgeo files) on disk, that are treated as points just like regular packed primitives. The advantages here are that A.) you can choose to load only a bounding box or locator into the viewport instead of the whole geometry, increasing performance, and B.) you can swap out what file is loaded, per-primitive, anytime in your node graph!
The trick here is to modify a packed primitive intrinsic attribute, which are hidden by default. To see them, open up the Geometry Spreadsheet, switch to primitive view, and open up the little tab that says “Intrinsics.” There’s all kinds of secret attributes here, and you should take a look around… other types of objects such as volumes and regular geometry also have intrinsic attributes, and it’s worth getting familiar with them.
The “unexpandedfilename” intrinsic is the one that actually decides what file to load. This can’t be changed using your usual methods to set attributes, but it can be changed using the setprimintrinsic() VEX command. So Wrangles to the rescue, again.
Write any three arbitrary geometries to disk somewhere, and name them “object01”, “object02”, and “object03”. Drop down a File SOP and load any of the objects, but change your “Load” parameter to “Packed Disk Primitive.” By default, you’ll see the geometry displayed as a simple bounding box, but you can tell Houdini to display the full geometry instead by modifying the “Display As” parameter. Next, connect this packed primitive to a Copy SOP’s first input, and any arbitrary template points to the second input. Create a random integer index attribute on the template points, same as before, but between 1 and 3 (to match our object name suffixes).
Put your display flag on the Copy SOP, and you’ll see that every object is the same, as expected. Now for the Wrangle. We can use a Point Wrangle even though we’re modifying a primitive attribute in this case, since we have exactly the same number of points and primitives and they’re in the same order. The goal here is to provide a new full path to the .bgeo files written out earlier, based on the value of index. We can do this via the sprintf() function:
// generate new path string based on i@index
string basepath = "C:/Users/Henry/Projects/examples/houdini/instances/";
string newpath = sprintf("%sobject%02d.bgeo.sc", basepath, i@index);

// modify packed primitive instrinsic
setprimintrinsic(0, "unexpandedfilename", @ptnum, newpath);
The syntax for sprintf() is a little weird if you haven’t used it before, but when you see a %s we’re substituting in the second parameter as a string, and %02d is substituting in the third parameter as an integer with 2 digits of padding. The result is returned as a string, which we pass to setprimintrinsic().
Here’s what your network should look like, more or less. No for-each block required!
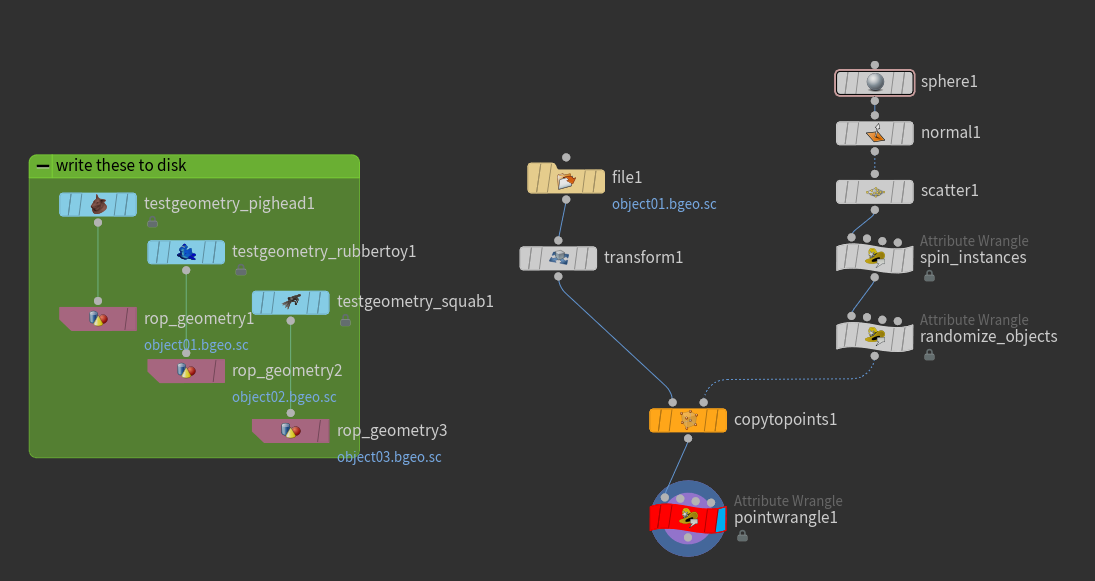
The network for modifying packed disk primitives in-place.
Setting the display flag onto this Wrangle reveals that the objects have changed:
Swapping out packed disk primitives using setpriminstrinsic().
If you can’t use packed disk primitives for whatever reason, you can pull off a similar trick by writing your different geometries to an Alembic sequence, one geometry per frame, and then modify the abcframe primitive intrinsic per-copy.
You can also save your .bgeo sequence out and load it back into Houdini via a packed disk sequence, which is a special load option on the File SOP. It’s then possible to simply set the index primitive intrinsic to whatever frame number of the sequence that you want to load, per-primitive.
If you actually read this far, I have a handy .hip file here that breaks all of this down into little mini-lessons. Feel free to look around!
Update: Another fancy instancing method
Tim Van Helsdingen posted a pretty cool video that can instance things much faster than the compiled For/Each Copy block in many cases. Check out his video: https://vimeo.com/352496032
The gist of it is that the Instance SOP can accept a string attribute in the parameter “Instance Attribute”. This attribute also allows for op: syntax, which means you can point to any SOP in your scene.
I’ve updated the example file above to include this new method. It’s pretty quick! Thanks Tim!
Yet another update: Houdini 18 instancing
Houdini 18 made this much easier than it used to be, using the new Copy to Points “Piece Attribute” parameter. All you need to do is pack each of your objects to copy so that each variant is a single primitive, then merge them all together. Your template points then need an integer point attribute, by default we can call it i@variant, that randomly selects one of these numbers. For example:
i@variant = int(rand(@ptnum)*3);
Then just check the box next to “Piece Attribute” on the Copy SOP and you’re good to go. The network looks something like this:
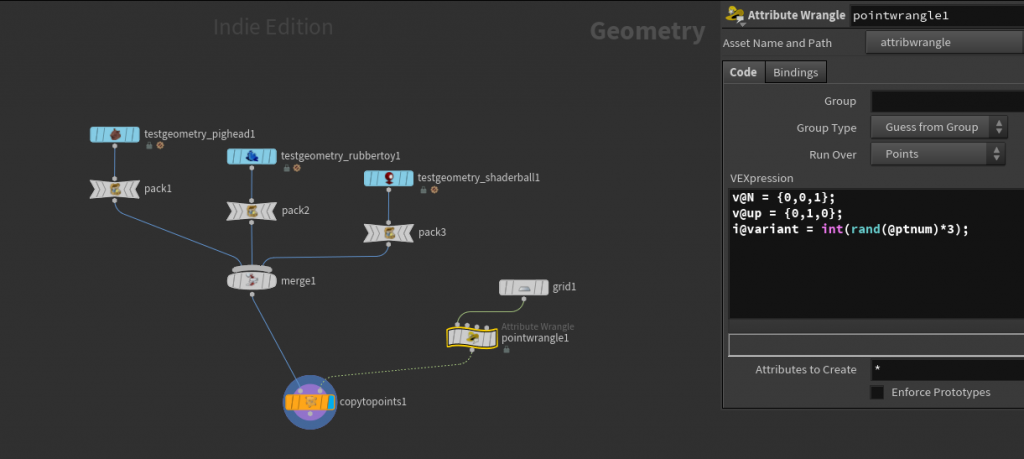
The network for Copy to Points in Houdini 18.
I’ve again updated the example file to include this new method. Hopefully it makes your life easier! Again, the file is here. Enjoy!

11 Comments
Dorin · 10/04/2017 at 13:19
OMG, such a great article, thanks so much. You made things so clear!
David · 10/27/2017 at 01:30
Took me a while (longer than I’d admit) to follow along but I got stuck at the end, loading varying geo instances from disk. I diagnosed the problem by using a print function instead of the sprintf to realise that I had the wrong disk path…. But we got it working, thanks lad!
Dorin · 11/09/2017 at 03:05
Hi again, revisiting your article after diving some more into instancing usage inside Houdini.
I wanted to ask you for some thoughts on Houdini’s Instance object workflow.
I’m trying to understand what advantage and when should i use each method ie: your presented method of copy to points vs instancing with points inside an Instance object and using an attribute wrangle on the points to select the objects to be distributed with the push string instances commands.
Best regards
toadstorm · 11/09/2017 at 08:01
Hi Dorin,
Each method works best in certain situations, though I think the Copy to Points with packed primitives is generally the most flexible method.
The old instancing method is perfectly valid, and in some cases the only way to go (instancing lights for example, or instancing in Redshift), but requiring that every object being instanced exists in its own object container can be a real drag when you have a lot of variations.
Copy to Points is easily unpacked into regular geometry, and For Each loops allow each copy to be customized, but the setup can be a little complicated to build, and even when in a Compile Block this method can be slow to cook.
Copying Packed Disk Primitives is great for easily swapping out instances, but it does require that your instances exist as files on disk, which can slow down fast iteration and experimentation.
I use all three methods situationally, so don’t feel like one single method has to be the best, but definitely understand how the ForEach/Copy method works because it’s the most flexible IMO.
Dorin · 11/10/2017 at 08:57
Thank you very much for the info. I am Redshift based now that you mention it. So if i understood correctly this should keep stuck with Instance object until(and if) packed prims are supported by RS – the downside being manipulating variations.
toadstorm · 11/10/2017 at 09:09
Yeah, for now old-fashioned instancing is the best method with Redshift. It does support packed primitives, it just doesn’t read them as actual “instances” meaning each packed primitive would be translated as its own shape data rather than pointing to one place in memory. Juanjo is constantly adding new features though, so I doubt this limitation will exist for long.
You can use
opdigitsto make your life a little easier for variations… let’s say you write out ten variants of a tree called “tree_#.bgeo”. You could create one geometry container, call it “tree_loader_1”, then in the File SOP inside you could point it to “tree_`opdigits(“..”)`.bgeo”. This would read the number at the end of your tree_loader_1 container, and apply it as “tree_1.bgeo”. This way you can just duplicate your container and each one would automatically point to a different file on disk.Dorin · 11/14/2017 at 05:08
That makes sense, thanks again for clarifying!
Christian · 01/18/2018 at 13:15
Fantastic article! I am currently wrapping my head around Houdini and this article what super useful for bootstrapping what I am trying to do. Thank you.
3. Everything You Always Wanted to Know About Nodes (But Were Afraid To Ask) | GAA Courses · 09/26/2020 at 19:44
[…] If you’re interested about a more technical approach to copying and instancing, here’s a good article that covers […]
Guía de Instanciación – Houdini 16 a 18.5 | Video Hot Trends - Ultimate Blogging Championship · 12/23/2020 at 17:37
[…] A Long-Winded Guide to Houdini Instancing […]
3. Everything You Always Wanted to Know About Nodes (But Were Afraid To Ask) | Professor E.'s Technical Arts Lab · 01/20/2021 at 07:35
[…] If you’re interested about a more technical approach to copying and instancing, here’s a good article that covers […]
Comments are closed.