I’ve already written two prior posts about managing the environment in a way that’s mostly geared towards Houdini artists: one about the houdini.env file, and another about Houdini package files. Both of these posts are still valid, but going by the number of messages and emails I still get from users who can’t figure out how to install MOPs or Redshift or any other third-party plugin, I figured it’d be a good idea to come up with a primer that explains what all of these different configuration files are actually doing (because they’re really both doing the same thing).
Houdini’s environment file, Houdini packages, the Maya environment file, all of these things are in the end setting environment variables for the process you’re running. Environment variables are just named string-type variables (“string” meaning “letters and numbers”) that point to various useful paths on your system, or define preferences or settings for applications. They’re typically formatted as KEY=VALUE, for example HOMEPATH=\Users\Henry, or OS=WINDOWS_NT.
Your system will typically have a handful of built-in environment variables that it recognizes. For example, on both Windows and UNIX-based systems you have PATH, that defines a list of “special” paths that the system will look for executables in to be run by name without having to type the full path. Many applications and plugins use PATH so that they can dispatch their child processes simply by saying hython or mayapy or redshiftCmdLine without having to define a full path every single time. If you don’t set this variable according to what the applications need, chances are they won’t function properly. Other common built-in variables include TEMP (the location for writing temporary files on Windows) or HOME (the current user’s home directory). If you want to see these variables on your system, you can just type env into the Windows search bar to reveal the control panel option (or open a Command Prompt and type set), or type export in a Bash shell to see a full list.
User vs. system variables
An important distinction to make with these variables is the difference between user variables and system variables. User variables are set per-user upon logging in. Most often the default user variables will include things like TEMP and PATH that evaluate differently depending on which user is currently logged in, often because the username is in the path somewhere. System variables are the same everywhere, regardless of who is logged in. The methods to set these variables are different, and we’ll go into detail on how to do this later on.
In addition to system-wide variables like these, there are also temporary variables that can be set at the shell level. When you start up a Bash terminal window or open up the Windows command prompt, you create a shell that has an environment comprised of the system and user variables we just mentioned. However, within that shell you can modify those existing variables or set new ones entirely, and any child process launched from that shell will inherit this updated environment. These shell variables only exist within the context of that specific shell; any processes launched from any other shell will not inherit these new values.
These shell variables are what Houdini.env, Maya.env, Houdini packages, and similar configuration files are dealing with. When you launch the application, it reads the associated .env file and sets various environment variables according to the given values. Some of these variables are application-specific: for example, Houdini uses HOUDINI_PATH when looking for HDAs, scripts, shelves, and so on, while Maya uses variables like MAYA_SCRIPT_PATH when searching for MEL scripts to source. These files also often modify existing variables like PATH… for example, both my Maya and Houdini configuration files update PATH to include the Redshift /bin/ folder where the necessary executables for rendering live.
Houdini has an alternative way of setting these environment variables, through JSON-formatted package files that I’ve described in earlier posts. In the end the result is the same as Houdini.env… packages set environment variables. They’re just a cleaner and more modular way of accomplishing the same task.
The reason for all of the different places to set variables is mainly about scope. If installing Maya also updated your system environment to include all these Maya-specific variables, not only would your system environment be full of useless junk variables that don’t apply outside of Maya, but some of the modifications to PATH or other important variables could cause problems with other applications. Defining these variables and making modifications at the shell level ensures that your system is impacted as little as possible when running the software.
How launchers work
If you’ve ever worked at a mid-sized or larger VFX facility, you’re probably used to using some kind of launcher or shell script to “check in” to a show or sequence, and then launch whatever authoring software you’re using (Maya or Houdini or Nuke or whatever). An artist would almost never just double-click a desktop shortcut directly to an application. The reason for this is that your pipeline team has likely configured a bunch of these environment variables, some of which are facility-wide, others which are going to be specific to a given show, or sequence, or even shot. For example, one show might have a different OCIO configuration than another, or your facility might have special “shortcut” paths defined like $SHOW, $SHOT, $ASSETS, etc. that can be used to quickly link to resources. Very often, the plugin versions for things like render engines will be locked at some point during a show’s progress, and the variables used by those plugins (such as $PATH or $REDSHIFT_COREDATAPATH) will need to differ between shows.
A launcher solves this problem by setting all of these variables in a shell, and then launching the appropriate application as a child process of that same shell. The launcher might just be a simple shell script, or it might be a fancy GUI, but either way it’s doing the same thing under the hood to ensure that all applications you launch are the right versions with the right environment configuration for your show. Remember: once you set a variable, all child processes of that process will inherit that variable (along with the rest of the environment variables).
Viewing environment variables
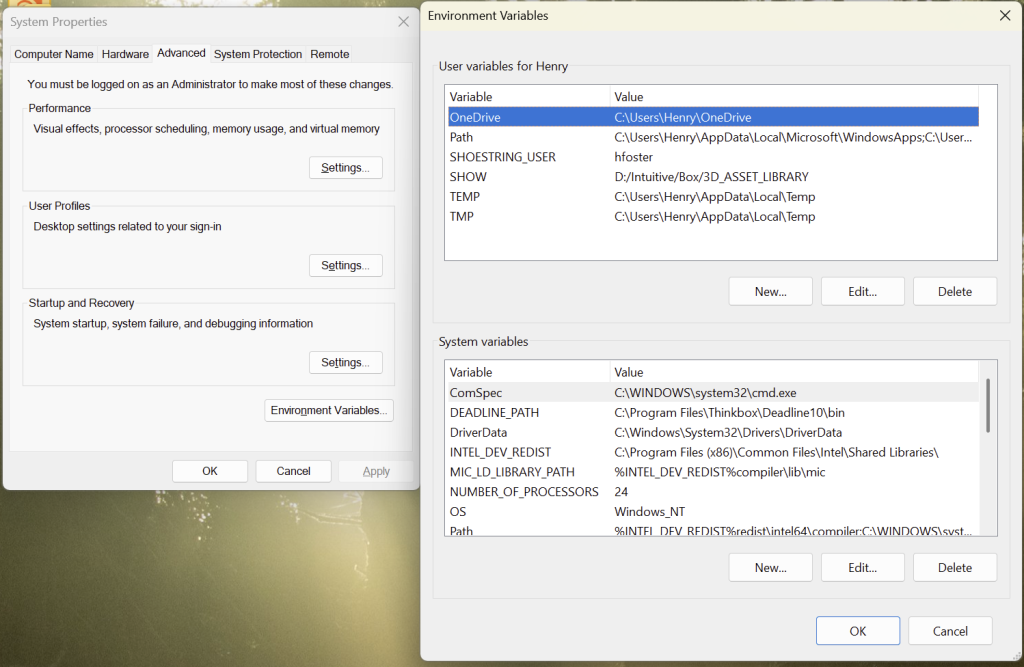
On Windows, you can go to System Properties > Environment Variables to see a list of environment variables for your user and system in a GUI, like this:
You can also open a Command Prompt and type set to see all the variables defined in the shell. On Linux and Mac OS, just open up a terminal window and type export.
If you’re in a Python environment, all the environment variables are stored in the os.environ dictionary. For example, os.environ["PATH"] is the value of your PATH variable. If you want an easily readable list of everything in your environment:
import os
for key, value in os.environ.items():
    print("{}={}".format(key, value))
Setting environment variables
So now that you know what these variables are about, how do you go about setting them? Remember that there’s three different types of environment variables you could be dealing with: system, user and shell. Each of these is set slightly differently from each other, and each operating system’s approach is a little different.
Shell Environment Variables
Shell environment variables are pretty straightforward to set. In Windows, you use the SET command in a Command Prompt:
set FOO=barIf you need to append to the existing value of a variable instead of overwriting it, you can add values together like this:
set PATH=C:\my\new\path;%PATH%
On Mac OS and Linux systems, you use the export command in a Terminal window instead. There’s a couple of other minor syntactic differences: you use colons instead of semicolons, and forward slashes instead of backslashes. Existing variables are referenced by the $ character instead of surrounding the variable with the % character. For example, the previous append to PATH on a Linux system would look like this:
export PATH=/my/new/path:$PATHYou can test your new variable by using the echo command. For example, on Windows:
echo %FOO%
should return bar. Similarly, on Mac OS and Linux you would type:
echo $FOO
Now try opening a new terminal window and running the echo commands there. Note how you get nothing! That’s because the variables only existed within the scope of the shell window you created. This might seem annoying, but generally to run a nice safe pipeline this is the behavior you want so that you don’t accidentally pollute some other process in an unrelated project with keys or values that might be misinterpreted.
Note: Linux and Mac OS also have a set command that’s very similar to export but with one important distinction: set doesn’t get passed along to child processes. This isn’t terribly useful for the kind of pipeline scripting I’m talking about here, so I’m ignoring it, but it’s important to at least be aware of the difference.
User Environment Variables
User environment variables are set on a per-user basis, which means that anyone under a particular login will have these keys set. User variables set this way on Windows are permanent when you set them. Be careful! You generally don’t want to mess with these, but just in case I’m including them for completeness’ sake. On Windows you can set these with the setx command:
setx FOO=bar
Setting user variables permanently on Linux / Mac OS systems works a little differently than Windows. Each time you switch users or close the session, the variables you export-ed are erased. To set them permanently, you have to include the export statements in an rc file (short for Runtime Command). This file is typically located at ~/.bashrc on Linux systems, and ~/.zshrc on Mac OS. The file probably already exists on your system for each user; just add the export lines to it and the variables will be defined permanently for that user from now on.
System Environment Variables
I’m not touching these. It’s potentially system-breaking to mess around here, especially on Windows. Linux and Mac OS make it more difficult to set anything system-wide but either way, it’s absolutely not worth messing with and I’m not going to be responsible for it.
Rolling your own bootleg pipeline
Let’s say you’re not a pipeline TD, you’re just some mercenary 3D artist who’s working on a bunch of different shows at once and isn’t blessed with an established pipeline. What if each different show needs a different OCIO configuration, or a different version of a render engine? What if everyone on your little team project has different drive mappings for their Dropbox or some other shared drive? Most importantly, what if you want to install a package for Houdini and have any clue whatsoever as to what’s happening? If you understand how to manipulate environment variables, you’re much closer to being able to solve all of these problems at once.
OCIO configuration
For example, let’s say a particular show you’re working on needs a specific OCIO configuration file. You need to be able to run both Houdini and Nuke with this OCIO configuration. How do you set this up?
On Windows, you could create a batch file (.bat) in a text editor that sets the OCIO variable and then runs the desired application, like this:
SET OCIO=C:\path\to\ocio\config.ocio
"C:\Program Files\Side Effects Software\Houdini 20.5.487\bin\houdini.exe"
Double-click that file after saving it with the .bat extension, and Windows will run it like an executable. You could run multiple SET commands in here if you like, or any other DOS command.
On Mac OS or Linux, you can create shell scripts (.sh usually on Linux, or .command on Mac OS) to serve a similar function. The syntax for exactly how to open the application is pretty different on Mac versus Linux, and I’ll assume that if you’re on Linux then you’re probably at least comfortable enough with the command line to figure out how to do it. On Mac OS the script might look something like this:
export OCIO=/path/to/ocio/config.ocio
/Applications/Houdini/Houdini20.5.487/Houdini/FX/20.5.487.app/Contents/MacOS/houdini
Save that on your Mac as houdini.command or whatever you like, then in the Terminal navigate to its parent folder and make the command executable:
chmod +x houdini.command
Now you can double-click it to activate your OCIO-configured Houdini or Nuke or any other application.
Path mapping
Houdini artists already have $HIP and $JOB, but you can easily make more of these path shortcuts for referencing files in any application that supports using variables in paths (including Maya, Houdini, Nuke and Fusion, among others). You can add stuff like $SHOW, $SHOT, $LIBRARY, whatever to your environment using set or export like the above example, and reference these when loading files in any of these applications rather than using the full path. This keeps things modular in case the fixed path on disk might change, and also makes it easier for multiple users with potentially different drive mappings or file systems to work on the same assets or shots without fear of a D: becoming an F: or whatever.
Shell aliases
Don’t want to have a separate shortcut to click on for every single app? You can just launch apps straight from the same terminal you set your variables from using aliases. An alias is basically just a typed shortcut to run any other command. On Windows you use the doskey command:
doskey houdini="C:\Program Files\Side Effects Software\Houdini 20.5.487\bin\houdini.exe"
Typing houdini into the terminal will launch the specified houdini.exe. On Mac OS or Linux you’d use the aptly-named alias command:
alias houdini='/Applications/Houdini/Houdini20.5.487/Houdini/FX/20.5.487.app/Contents/MacOS/houdini'Note that aliases, like shell environment variables, are temporary and only exist within the given environment they’re created in. If you want them to be permanently available on your Mac or Linux workstation, you can include them in ~/.bashrc like you would with user environment variables.
Of course, aliases don’t have to be single commands. You could have an alias both set the OCIO variable you wanted and then immediately launch houdini using $t as the line break between commands:
doskey houdini=SET OCIO=C:\path\to\ocio\config.ocio$t"C:\Program Files\Side Effects Software\Houdini 20.5.487\bin\houdini.exe"Similarly on Linux or Mac OS:
alias houdini='export OCIO=/path/to/ocio/config.ocio;/Applications/Houdini/Houdini20.5.487/Houdini/FX/20.5.487.app/Contents/MacOS/houdini'Configuration files
Time to get a little weirder. You probably don’t want to have to save a unique batch file for every application, or for every single show, in order to get your environment configured the way you want it. It’s not hard to do but it can get a little clunky building all those shortcuts. What if instead you just set the root path of your show as an environment variable, and then let your pipeline scripts load a configuration right from the show? That way everything is nice and modular, and you can customize OCIO configurations, Houdini package paths, Nuke scripts, plugin versions, whatever else you need on a per-project basis.
Windows of course makes this kind of weird because DOS batch scripting is an ancient language that’s hardly used anymore. That said, it’s still very possible. Let’s say that you’ve set a user environment variable called SHOW that’s the root path of your project, for example D:\Projects\VFX\MyProject. We can create a file at that path, let’s call it show.env, and fill it with definitions for environment variables like this:
OCIO=C:\path\to\ocio\config.ocio
HOUDINI_PACKAGE_DIR=%HOUDINI_PACKAGE_DIR%;%SHOW%\houdini_packages
HOUDINI_VERSION=20.5.487
Here I’m defining an OCIO configuration, a directory within the show itself that I can place Houdini package files in (maybe this show uses a specific build of Redshift, for example), and a version number for Houdini that I can use to create the alias that I want for Houdini in this show’s environment. HOUDINI_PACKAGE_DIR is one of the many built-in Houdini-specific environment variables that you can use to configure Houdini prior to launching it. There are similar variables for Maya and other software as well.
Now we need to write a batch file (or shell script) that reads this configuration file and sets these variables. This is effectively our “launcher” application that initializes the environment and allows us to run other programs within this environment, from the command line. It might look something like this:
@echo off
REM read the show.env file that's located at the %SHOW% directory. this assumes %SHOW% is already defined.
IF EXIST %SHOW%\show.env (
    echo Reading show environment overrides.
    for /f "tokens1,2 delims==" %%A in (%SHOW%\show.env) do (
        call :ExpandVars "%%A" "%%B"
        GOTO :EOF
    )
)

REM define ExpandVars, which actually sets the variables. this has to be in its own function to avoid parsing errors in the for loop.
:ExpandVars
SET "%~1=%~2"

REM this is everything you want done after reading the configuration file.
:EOF
DOSKEY houdini="C:\Program Files\Side Effects Software\Houdini %HOUDINI_VERSION%\bin\houdini.exe"
echo "Current show path is: %SHOW%"
Save that as start_pipeline.bat or whatever works for you, and now in a command line (assuming you’ve navigated to the directory where the batch file is, or you’ve added that directory to PATH) you can type start_pipeline and it’ll read the variables set up for your current show and create an alias for Houdini that you can then use to launch the correct version for your show. DOS scripting is ancient and ugly but it does still work.
In a Linux or Mac OS environment the syntax is a bit different:
. $SHOW/show.env
alias houdini=/Applications/Houdini/Houdini$HOUDINI_VERSION/Houdini/FX/$HOUDINI_VERSION.app/Contents/MacOS/houdini
echo "Current show path is: $SHOW"
To execute this in a terminal, you have to use the source command or else the variables won’t actually be set in your current shell, so if your script were named start_pipeline.sh your command to start this environment would be source start_pipeline.sh, or the shorthand . start_pipeline.sh.
With this script in hand, anytime you start a new session or change the path to $SHOW, all you have to do is run start_pipeline and now your whole environment is configured for you, per-show. You could have this script set as many aliases and environment variables as you’d like, and any program you run from this shell will inherit it.
But I hate scripting!
So do I. Get over it. The whole point is that you only have to set this up once, and from then on you never have to think about it again. If you want to work faster and be able to manage more projects at once, some kind of pipeline is necessary, and that means automating a thing or two to prevent mistakes later on when you’re sleep deprived and trying to get a bunch of shots done at 3 in the morning.
Understanding what the environment is and how it works is essential to understanding how to configure Houdini, Maya, Nuke, Fusion, and all manner of other programs.
I hope you can see how this can be a really powerful way to organize your own little mini-pipeline!