I’ve been putting off working in ACES for years now, because almost every explanation of the system I’ve tried to read online has been either extraordinarily technical and long-winded, or read like a sales pitch with no useful information about implementation. It takes a certain amount of training and understanding to get a team of artists to work with ACES reliably, and so to save my own sanity I just stuck with the usual “linear workflow” and tried not to worry about it. Now that I’m running a much smaller team at my current job, I decided it was time to actually try to implement ACES for real, and this is my attempt at writing down what I’ve learned into a practical guide for why and how you should implement ACES in your own work. I’m probably (definitely) over-simplifying plenty of details, but that’s what all the long and boring technical guides that smarter people have written are for. Feel free to yell at me in the comments if you like.
An important note: I’m a (technical) 3D production artist, not a color scientist. The “Idiot” in this Idiot’s Guide is me. I’m just trying to translate a lot of difficult jargon and theory into something that’s practical for use by normal humans, because I could barely make any sense out of it myself. I’m likely taking shortcuts and making compromises in certain places that would make a Real Color Scientist’s eyes bleed, but that’s the nature of production… sometimes you have to break the rules to get the image the client wants.
WTF is ACES?
ACES is a color system that’s meant to standardize how color is managed from all kinds of input sources (film, CG, etc), and provide a future-proof working space for artists to work in at every stage of the production pipeline. Whatever your images are coming from, you smoosh them into the ACES color standard, and now your whole team is on the same page.
For CG artists, a big benefit is the ACEScg color gamut, which is a nice big gamut that allows for a lot more colors than ye olde sRGB. Even if you’re working in a linear colorspace with floating-point renders, the so-called “linear workflow”, your color primaries (what defines “red”, “green” and “blue”) are likely still sRGB, and that limits the number of colors you can accurately represent.
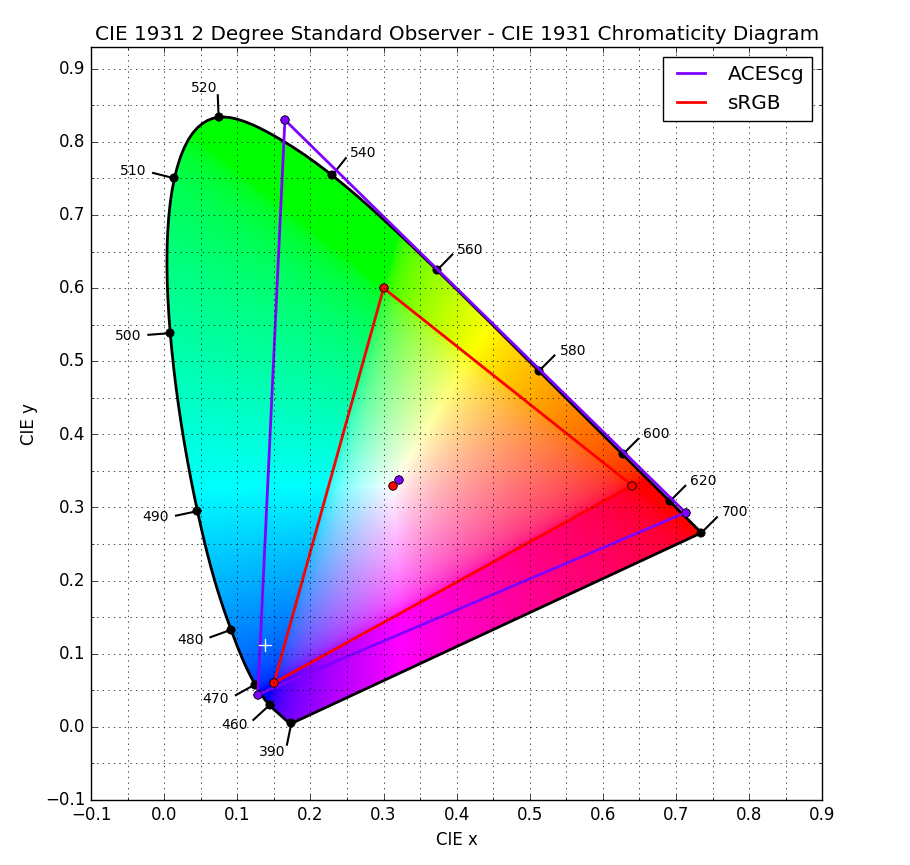
What we typically think of as “linear” versus “sRGB” is a bit of a misnomer… a linear colorspace can use sRGB primaries, which is what most of us outside of ACES are dealing with when we’re working with “linear” textures or renders. What we usually call “sRGB” is also using the sRGB primaries, but with a 2.2 gamma curve applied in order to make it display properly on typical monitors. ACEScg, on the other hand, uses its own set of primaries called “AP1”, which allows for that nice big triangle o’ colors in the diagram above. Remember that the sRGB / Rec. 709 standard was developed back when we were still using CRT monitors and wearing acid washed jeans. It’s time to put away your NKOTB World Tour t-shirt.
Here’s a quick example showing you the difference between a render in your typical sRGB “linear” workflow, and an ACES workflow. You can tell right away that the colors you get are significantly more “real”, especially at the extremes of brightness and saturation.
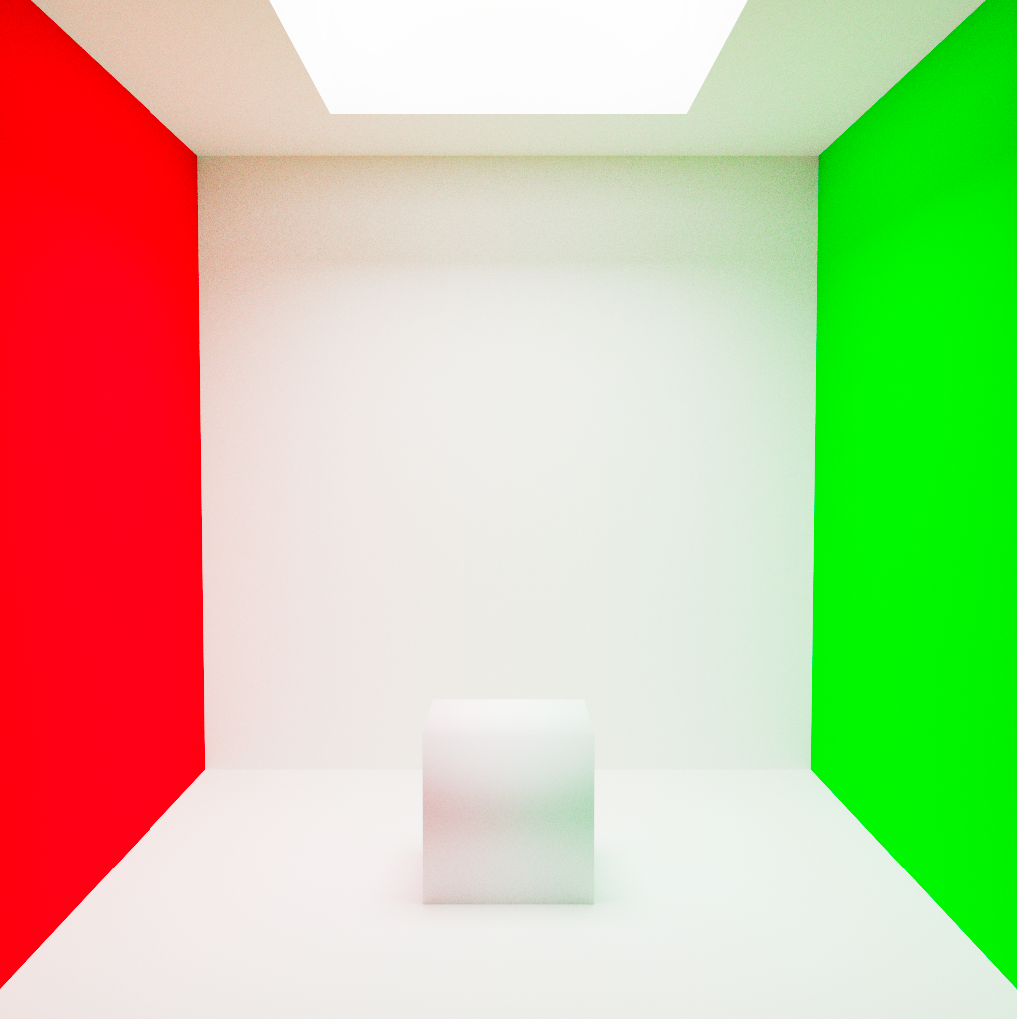
The typical “linear” workflow. Look at those super-saturated colors! 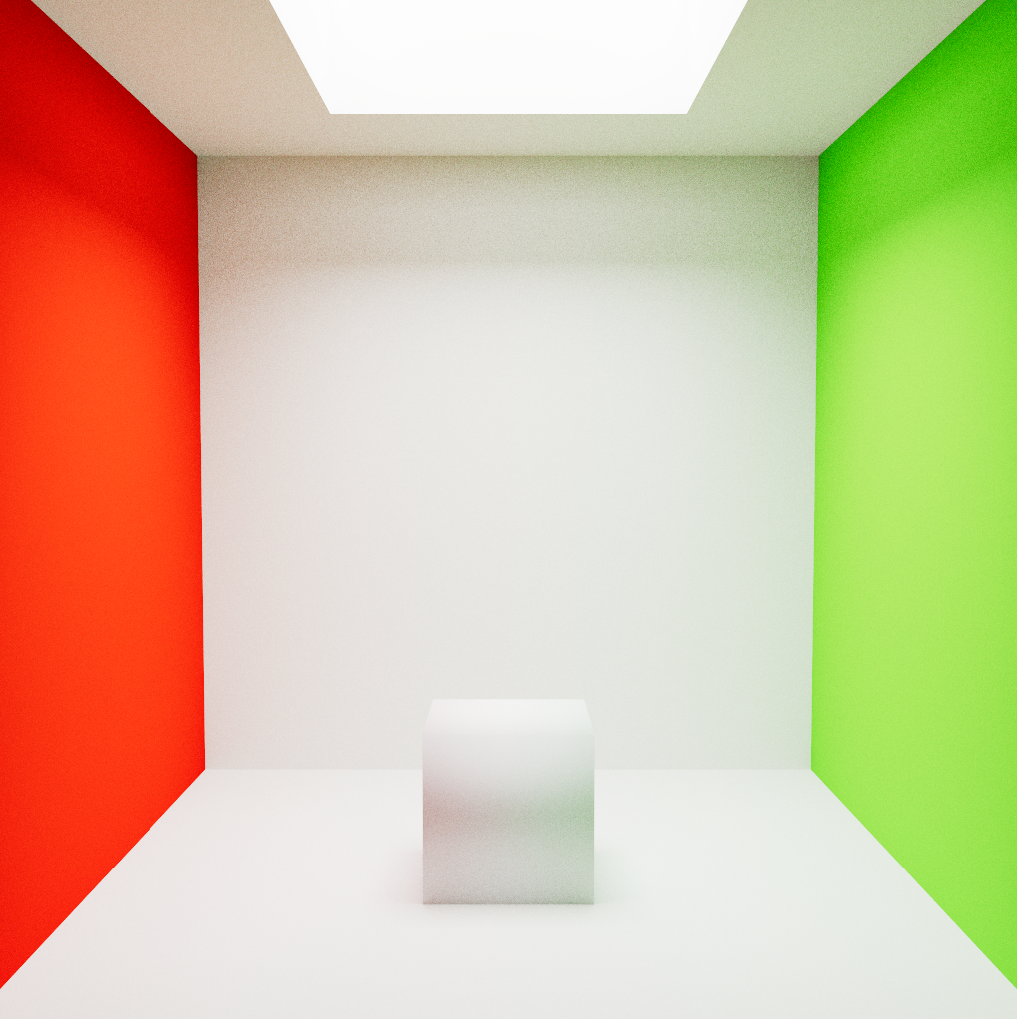
The same exact scene, with the colors first converted to ACEScg, displayed with the ACES sRGB LUT.
ACEScg is the ACES color space of choice to use for CG artists because it’s linearly encoded (as opposed to logarithmically, which tends to be how non-CG people like to think about exposure), so your render engine and compositing program of choice will play nicely with it. There are other color spaces defined in the ACES specification, including the ACES 2065-1 space for archival and interchange purposes, but as a CG artist the only one you really need to worry about for now is ACESCG.
The Viewer LUT
So, we know we have ACESCG as the color space we want to work in. However, your crappy monitor can’t display this whole space. Even if you have a nice monitor, it can probably only accurately display the DCI-P3 gamut, which is still not as big as ACESCG. The other space you need to define, then, is your “viewing” space. This is kind of like when you’re looking at a linear render and everything appears way too dark until you hit the “sRGB” or “gamma 2.2” button… the image needs to be transformed from whatever color space it’s rendered in to a space that your monitor likes. This viewing space is dependent on your own monitor situation, but if you’re not on a fancy monitor, it’s probably either sRGB or Rec. 709 (the two are very very similar). You’ll need to make sure that when you’re viewing or compositing your renders that you’re looking through the right viewer LUT that transforms your renders from ACESCG to sRGB or Rec. 709 or Rec. 1886 or whatever you’re into.
One other thing… the “Output” color spaces in ACES have something called an “RRT” involved, which stands for “Reference Rendering Transform”. This is an overly-technical way of saying that there is an extra transformation happening between your ACEScg scene and your sRGB or Rec 709 viewer space! The RRT is similar to your typical S-curve that you’d apply to renders or footage to get nice deep blacks and rolled-off highlights. It looks great, but it can introduce complexities later on when you’re trying to get exact output colors from a matching input… which frequently is a necessity in commercials when you’re matching brand colors or compositing screens onto objects. More on this in a bit.
Converting Input Textures
You’ll also need to make sure that any applicable color textures you’re using are converted into the ACEScg color space. This part can be tricky, because textures can come from a wide variety of sources. You’ll need to apply what’s called an “input device transform”, or “IDT”, to these textures. Most textures you download from the internet are going to be in the sRGB color space, which you’ll see in OCIO as “Utility – sRGB – Texture”. If you have nice linear EXR textures or renders, your IDT would instead be Utility – Linear – sRGB. The naming here is of course confusing, because everything about color is confusing, but the Linear – sRGB there means that you’re dealing with an image that is rendered with linear values, i.e. no tonemapping curve, but using sRGB primaries. Your typical JPEG is also using sRGB primaries, but it has an input gamma curve of 2.2, so it’s not linear.
When in doubt, if the image isn’t floating-point, use Utility – sRGB – Texture. If it is floating-point, use Utility – Linear – sRGB.
Color swatches are no different! You’ll need to make sure that the values you’re inputting, if you’re not converting them directly through an OCIO transform node in your software of choice, are in the ACEScg space.
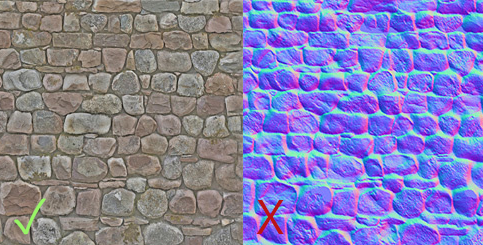
Now, above I used the qualifiers “applicable” and “color” when describing textures that you need to convert to the ACEScg color space. What I mean by this is that you only want to convert textures that describe color, and not textures that describe data. A diffuse or albedo texture map describes color and needs to be color-corrected. A normal, displacement, or roughness map describes data and should NOT be converted. It’s important to keep this distinction in mind when color-correcting your input textures!
How to actually set up ACES
First off, you need to download the actual definition of these fancy ACES color spaces. The easiest way to do this is to use the OpenColorIO (OCIO) configuration. You can download it here: https://github.com/colour-science/OpenColorIO-Configs
Inside you’ll find several different ACES configurations. I’m using v1.0.3 here. In the aces_1.0.3 folder, you’ll find a file called “config.ocio”… this is the main file you’ll be pointing to in other applications that can use ACES. Some applications like Fusion have in-app controls to allow you to specify an OCIO configuration file, but in general the easy way is to set up the OCIO system environment variable. You just need to set OCIO=/path/to/config.ocio, depending on where you’re storing the config.ocio file. On Windows, you can do this through Control Panel > System Properties > Advanced > Environment Variables. On Linux or OSX, you want to use the “export” shell command like so:
export OCIO=/path/to/config.ocio
If you want this to apply permanently, you can add the line to your user’s “.bash_profile” file, found at ~/.bash_profile, using any text editor. Start a new shell or logout/login again to apply the change.
Most relevant 3D and compositing applications will recognize this OCIO variable automatically, and so you can move onto configuring the exact color spaces you want to use per-application.
Configuring your applications
Next, you need to configure your application. This is where things can start to get complicated, because the exact setup procedure is different depending on what app you’re using, and what render engine you’re using. I’ll include a few examples of common applications here.
Maya
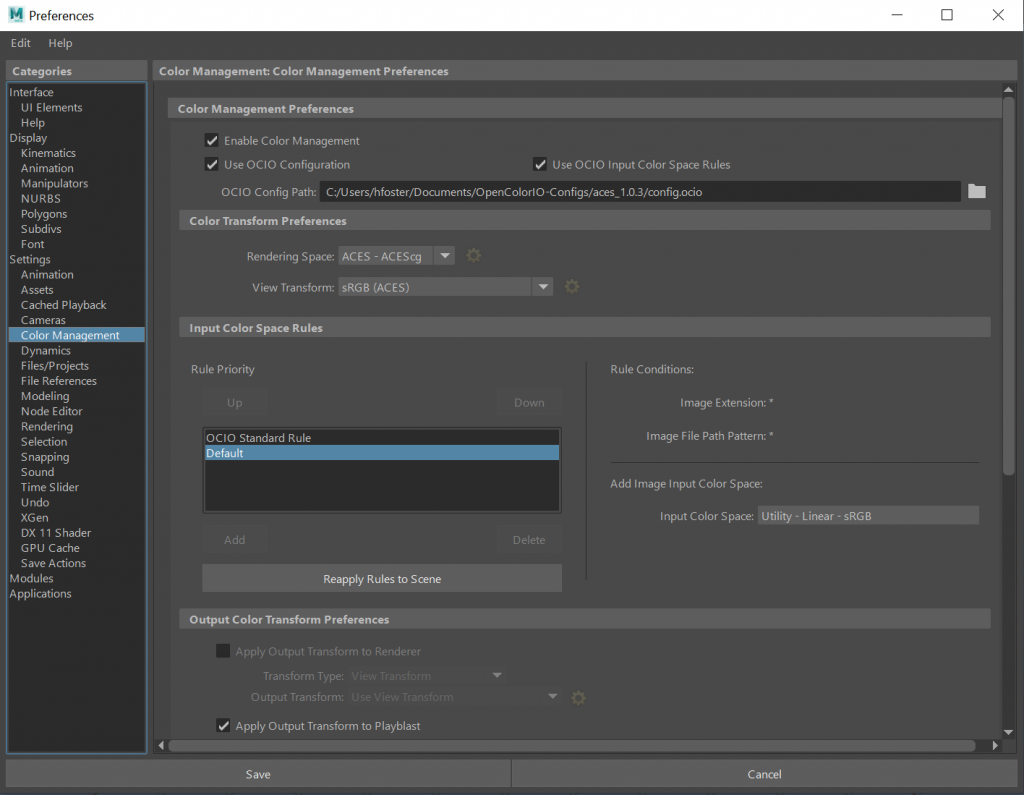
Maya has built-in color management now, though not every supported render engine is compatible with it (I’m looking at you, Redshift!) To use it, go to Maya’s preferences, Settings > Color Management, and check Enable Color Management and Use OCIO Configuration. If the OCIO Config Path isn’t filled in, set it to the path of the config.ocio file you downloaded earlier. Once that’s set up, you can define your “Rendering Space” and your “View Transform”. The Rendering Space should be our new friend ACEScg. The View Transform is your “viewer” space… for most of you this is sRGB or Rec. 709, depending on your monitor. Finally, you can set up a list of default rules for how you want Maya to handle input textures, based on the file extension or the path on disk. Remember that these rules are just guesses, and will not be smart enough to tell the difference between a color texture (convert this!) and a data texture (do not convert this!) unless you set up your file path structure on disk to enforce these rules! You’ll likely have to manually adjust the color transform settings on your File nodes on certain textures. The important part is to just be aware of the input color space of your textures, and don’t rely on the automated rules to do this thinking for you.
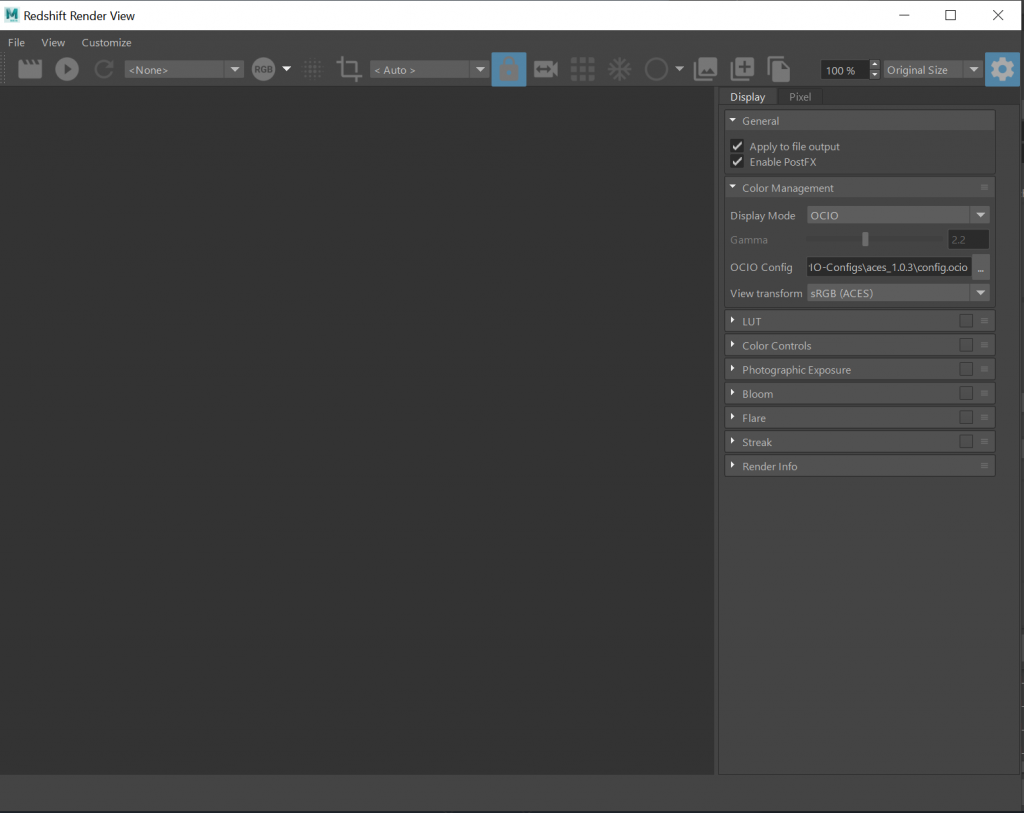
Finally, you need to configure your Render View to display your renders through the correct LUT. This is different per-render engine. In Redshift, this is configured in the “Redshift Post Effects” settings, available via Render Settings > Color Management, or from the Redshift Render View by clicking the gear icon at the upper right of the Render View window (expand the window if you can’t see it), then looking for the Color Management dropdown.
Of course, Redshift (and probably some other render engines I don’t use) don’t yet support Maya’s internal color management system. In cases like this, you’ll want to disable Maya’s color management, and you’ll have to convert your textures manually outside of Maya. The two easiest ways to handle this are the “ocioconvert” tool that comes packaged with OpenImageIO (https://github.com/OpenImageIO/oiio), or a compositing application like Blackmagic Fusion or Nuke. The rules are otherwise the same… transform the input texture from the appropriate input space (Utility – blah blah blah) to the ACEScg space, then save the file.
Houdini
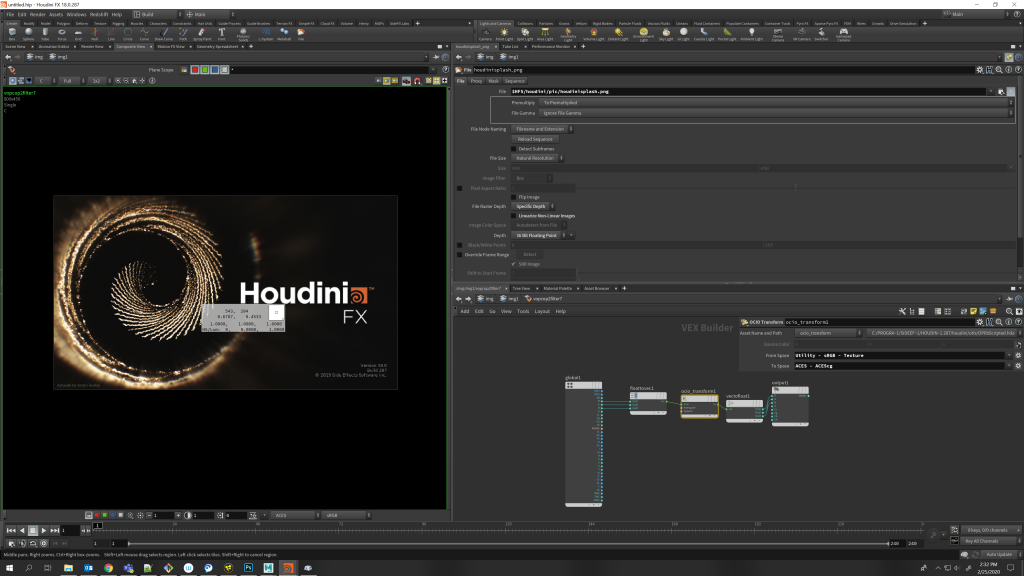
If you’ve set the OCIO environment variable, Houdini’s Render View should automatically show a list of available ACES display LUTs at the bottom, along with the exposure and channel masking controls (these are hidden by default; just click the little ridge at the bottom of the render view window if you don’t see them). You can use the OCIO Color Transform VOP to transform input textures from the appropriate input spaces to ACEScg.
Again, some render engines may not natively support the OCIO Color Transform VOP, and in these cases you’ll have to color correct your textures manually. Since you have Houdini, you can use COPs to transform your textures natively rather than relying on OpenImageIO or an external compositing program to convert them. Redshift currently doesn’t support it, and Mantra’s built-in ubershaders (the Principled and Classic shaders) have their own built-in color correction assumptions that don’t seem to lend themselves to in-line color transforms in the MAT context. It’s probably safest (and fastest) to pre-convert your textures into ACEScg before rendering.
Something to keep in mind specifically when using the File COP in Houdini is that it tries to linearize your textures for you! You can either change your OCIO Transform VOP’s input space to Utility – Linear – sRGB, or uncheck “Linearize Non-Linear Images” on the File COP. You’ll also want to change the “File Raster Depth” to be “Specific Depth” and set the Depth to either 16- or 32-bit floating point. You don’t want to be writing 8-bit images in ACEScg.
Fusion
If the OCIO environment variable is set, Fusion should automatically list the “OCIO ColorSpace ViewLUT” in the list of available LUTs at the bottom of each viewer. Click the “LUT” button to enable a viewer LUT, then click the arrow next to it and select the OCIO ColorSpace ViewLUT, then go to Edit… to set your source and output spaces. Your source space is always going to be ACES – ACEScg. Your output space, as always, depends on your monitor… this will likely be “Output – Rec. 709” or “Output – sRGB”.
With these settings, you can just import ACEScg renders and composite like you normally would, since ACEScg is a linear space. However, if you have other footage going into the comp that is not ACEScg, you’ll need to use the OCIOColorspace node to transform the footage from the appropriate space to ACEScg. You can use the same rule of thumb for most footage… if it’s an LDR image, it’s probably “Utility – sRGB – Texture”, and if it’s HDR it’s probably “Utility – Linear – sRGB”.
Finally, when writing your comp to disk, you’ll likely need to do another color transform. The space to write to is dependent on your own local color pipeline. If you’re delivering to the web, mobile, or typical TVs, you’ll probably be converting to Rec. 709. If you’re delivering an HDR spot, you might be converting to Rec. 2020. If you’re trying to write out final images to DI and they want to be super-ACES-compliant, you’ll render to the archival ACES2065-1 space. If in doubt, ask your colorist. Use the OCIOColorspace node to transform to the output color space before your Saver node. If the image looks weird when you preview this node, it’s because your viewer LUT is still enabled… you can disable it to check your colors before writing if you’re paranoid.
Nuke
You can set your working color space in Nuke under Project Settings > Color. Your working space is ACEScg. Your “monitor” space is the same as your “viewer” space mentioned above… this will likely be “sRGB” or “Rec. 709” if you have a typical monitor. You can set presets for incoming footage below… 8-bit files should default to “Utility – sRGB – Texture”, and float files to ACEScg. Just remember that if you’re importing float files that didn’t come from one of your ACEScg renders, you’ll need to use an OCIOFileTransform node to convert from the appropriate space (probably “Utility – Linear – sRGB”) to ACEScg.
Before writing final images to disk, use the OCIOFileTransform node to convert your comp into the appropriate delivery color space. See the “Fusion” section above for hints on what color space you might want to write to.
Annoying ACES gotchas
Of course, aside from having to read articles like this one, there are certain annoyances with the ACES system, especially for those of us that are frequently rendering things that aren’t necessarily “realistic”. The biggest problem I’ve run into is trying to get the result of an ACES render or comp to match a reference image… for example, a matte painting or a phone screen that needs to be tracked onto a device, or anything self-illuminated that isn’t actually acting like a light. If you just apply the usual sRGB -> ACEScg conversion, you’ll notice that your self-illuminated material appears muted in renders.
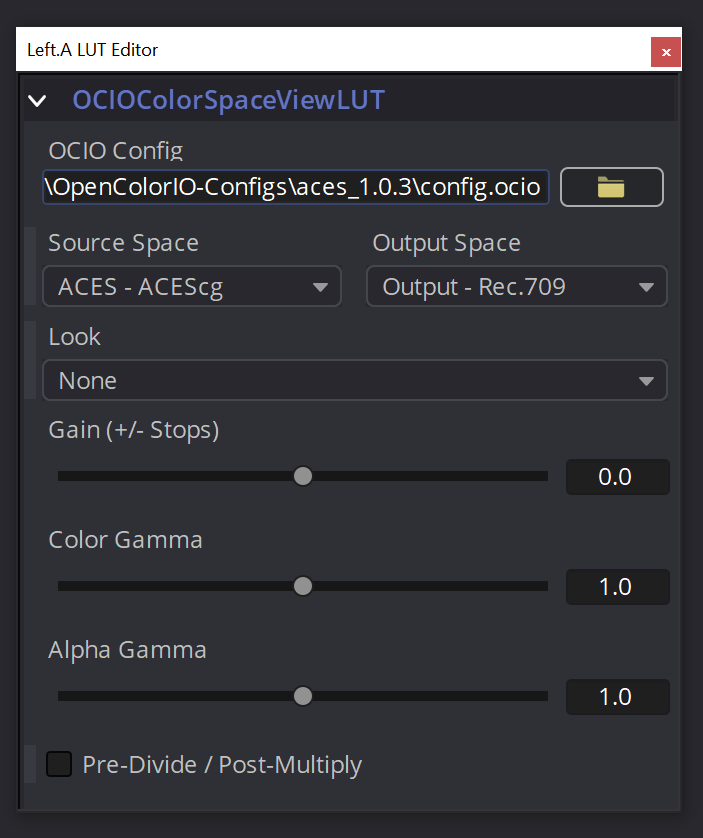
In situations like this, you have a couple of options, depending on where in the process you are. If you need a self-illuminated material in 3D to appear in renders exactly as it appears when you view the texture outside of ACES, you need to convert the texture to ACEScg, but from the OUTPUT space rather than the usual input space. This means that if your viewer is using the “Output – sRGB” space, you want to use this as your texture’s input space. This will ensure that, perceptually, the opposite of your viewer LUT, including the RRT S-curve tonemapping mentioned earlier, will be applied to your texture, so it will look exactly the same coming out the other side of ACES. This means that your output color values might come out pretty weird! Take a look at this screenshot and pay close attention to both the OCIO Transform settings and the color info window that appears over the render on the left.

In the above screenshot, what you’re seeing as “white” is actually a value of about 16. Other colors might also be affected in strange ways by this process, especially when dealing with very bright or saturated colors. Keep numbers like this in mind when debugging issues with global illumination or weird reflections or other render glitches, or when grading these renders after rendering!
On the compositing side, your best option for solving this same problem is simply exiting ACEScg space temporarily. This is best done near the end of your comp, for obvious reasons. Use the OCIO transform tools to convert from ACEScg to sRGB, change your viewer LUT to view in standard sRGB, then comp in your sRGB elements like screens, subtitles, end cards, etc. This has the advantage of avoiding the aforementioned wacky color values, but can cause problems down the line if you’re trying to output to an HDR delivery target, and you’ll need to make sure that your colors don’t screw up if you have to output to Rec. 2020 or ACES2065-1 or ACEScc or whatever.
Closing Thoughts
Even for what’s supposed to be a quick and practical guide, this is obviously a bit of reading. The ACES system is a good idea, but its implementation is still difficult and counter-intuitive, and it requires that everyone on your art team has an understanding of what color spaces to convert to and when to convert (or when not to). I hope this write-up at least gets you to understanding the basics of the system, and when you’re ready for the deep dive, I highly recommend you read the following guides:
ACES Primer: https://acescentral.com/uploads/default/original/1X/6ad8b74b085ac8945c1e638cbbd8fdf687b7f60e.pdf
Chris Brejon’s ACES Guide: https://chrisbrejon.com/cg-cinematography/chapter-1-5-academy-color-encoding-system-aces/
Special thanks goes to Hernan Santander, Joe Pistono, Lewis Saunders, and Robert LaPlante for helping me make sense of all this ridiculous color business.
61 Comments
ARIEL SERGIO WOLLINGER MARTINS · 02/25/2020 at 19:52
What is Rec. 1880?
toadstorm · 02/25/2020 at 20:06
A typo… I meant Rec. 1886, another color standard that showed up after Rec. 709. Sorry about that!
ARIEL SERGIO WOLLINGER MARTINS · 03/01/2020 at 12:40
The correct name would be BT.1886
ARIEL SERGIO WOLLINGER MARTINS · 03/01/2020 at 12:40
Great article by the way
ARIEL SERGIO WOLLINGER MARTINS · 03/01/2020 at 12:42
Also bt 1886 is just the eotf, not a color space.
Nick · 02/26/2020 at 01:29
Big thanks for the explanation! ACES caught my eyes since the Lego Movie was introduced and they made a big deal about it in BTS.
D L O H · 02/26/2020 at 07:35
Thanks for this, but I’m still struggling with something- if we’re rendering into ACES exr (specifying the color space in the ROP), do we still need to convert all SRGB textures using the COP method shown above? Or will all of that be taken care of at rendertime? (using arnold & houdini)
toadstorm · 02/26/2020 at 07:41
Yes… you want to convert all relevant textures from their source color space (sRGB or linear sRGB) to your working space, ACEScg.
D L O H · 02/26/2020 at 07:54
cheers man!
Matt Barker · 02/26/2020 at 16:35
Heya DLOH, theres also free tools out there to speed this up a bit, i love this little toolset.
https://github.com/DominikLingenover/DMNK-Tools
It has an aces converter in it. The texture and speedtree importers are a huge timesaver too.
D L O H · 03/06/2020 at 08:02
Thanks Matt, will check ’em out!
Daniel Moreno · 02/26/2020 at 08:12
Thank you for this! Helped me a great deal !
Thomas Mansencal · 02/26/2020 at 11:35
Hi,
Great article overall! I would like to point out that the “officially” maintained OpenColorIO Config for ACES is available on my fork: https://github.com/colour-science/OpenColorIO-Configs. There should be final support for ACES 1.1 and preliminary support for 1.2. There have been ongoing discussions for many months to get them back into the Sony/ASWF repo but for the time being, they are at the URL I gave.
Cheers,
Thomas
toadstorm · 02/26/2020 at 15:30
Thanks, I’ll update the link accordingly!
Sam Hodge · 02/26/2020 at 12:04
This guide is outstanding, it might be worth leaving some other colour science links about the whole light in the physical world and acquisition stuff too. Also some links to what CIE XY and RGB primaries mean. I am definitely using this with my CGI lighting students.
toadstorm · 02/26/2020 at 15:29
I didn’t want to get too bogged down in theory in this post, but those are good points… I can add some more links to the recommended reading at the bottom if you have any particularly good ones.
Matt Barker · 02/26/2020 at 16:54
Thanks for this. Great guide.
Martin · 02/27/2020 at 03:10
Thanks a lot for the article! Really helped me a lot :)
Michael · 02/29/2020 at 09:56
Thank you for the great guide. Quick question – When we render CGs, is there a difference between rendering with ACEScg and rendering with just linear(sRGB primary) and converting to ACEScg? If so, which one would you recommend more?
toadstorm · 02/29/2020 at 10:43
You want to convert everything over and render in ACEScg to take advantage of its nice fancy AP1 primaries. Rendering in linear sRGB and converting afterwards won’t really give you the benefit of doing the lighting computations with all your colors converted to the ACEScg gamut, and so you’d likely end up with the same unrealistic super-saturated colors and other artifacts you’d get at the extremes of an sRGB render.
Dennis · 02/09/2021 at 15:11
Thanks so much for this guide, helped me a lot.
I am not really sure if I have a problem here or if I am getting it wrong. With “convert everything over and render in ACEScg” you mean something like bake the ACES into the final image so you don´t have to add it back in post?! I am trying to render the exact same result from the Redshift Renderview with ACES turned on to my finale ROP renderings. But it seems like the ROP is just rendering the sRGB. Even with Apply to file output and Enable PostFX turned on. Can you give me a hint what I am doing or getting wrong?
Thanks in advance.
toadstorm · 02/10/2021 at 15:13
You don’t want to bake anything into your final image, including any post FX (they can potentially clip or roll-off highlights, which means lost data). If your input color textures and swatches are converted to use ACEScg primaries, that’s all you have to do… your output render should be a linear EXR using ACEScg primaries. It won’t look right unless you’re viewing through the proper LUT, which Redshift’s viewer has. In your compositing application, you’d want to make sure you have the same viewing environment set up (input is ACEScg, output is probably sRGB or Rec. 709).
Alexandr · 02/29/2020 at 11:38
Hey, can I translate it to Russian and publish with a link to your blog?
toadstorm · 02/29/2020 at 11:45
Yeah, of course! Thanks for asking.
tronlee · 04/03/2021 at 01:45
so i will be translate it to chinese and publish with your ownsome link too.thanks a lot and respect!
Carol · 03/03/2020 at 13:07
Great intro article :)
Worth pointing out ACES Central as a resource: http://www.acescentral.com
It’s a community forum full of resources, experts, and a great place to ask questions and get help.
Zigmund · 03/22/2020 at 00:45
Hey, great guide, thanks a lot. Could you please clarify, you say, all textures should be converted to ACES. Does it include hdri maps? specifically for domelight in redshift. It seems redshift domelight doesn’t COPs…
toadstorm · 03/23/2020 at 20:51
Yep, your HDRI textures should be converted as well (from linear sRGB to ACEScg).
Zigmund · 03/30/2020 at 01:03
I have noticed that using OCIO Transform VOP’s input space to Utility – Linear – sRGB, or unchecking “Linearize Non-Linear Images” on the File COP gives slightly different results. Unchecking “Linearize Non-Linear Images” gives more saturated image. So which option do you recommend? Or does it depend on texture i import?
toadstorm · 03/30/2020 at 08:06
I haven’t done the side-by-side comparisons, but I’d lean towards using OCIO with explicit instructions on how you want the color converted, rather than Houdini’s automatic guess at what you want.
Vanya · 04/06/2023 at 20:33
To me color look identical but I noticed that it has slightly more contrast when you export with unchecked “Linearize Non-Linear Images” (using SRGB-Linear-Texture) method (for Houdini users) Which is better for comp because it’s less “crushed”.
Sean Redmond · 04/14/2020 at 18:26
I just wanted to say THANK YOU for this incredible explanation. I read up on ACES a few months ago but have always put off incorporating it into my workflow due to the confusing and unapproachable way every other article I have read talks about ACES. I’m finally setting up the workflow for it now and am very excited.
Cheers!
toadstorm · 04/14/2020 at 18:49
Thanks for the comment! I’m glad it was helpful for you!
New · 05/24/2020 at 12:57
dumb question but when you set Environment Variables in windows , do you set it in User or System variables?
toadstorm · 06/10/2020 at 15:04
Sorry I didn’t see this comment before! WordPress is really bad about informing me of new comments.
You can set it in either location; it’s up to you what works better for your environment. System variables affect all users on a computer; User variables affect only the person logged in. Personally I set OCIO in a shell and then launch Houdini/Fusion/whatever as a child process of that shell so that it doesn’t affect the configuration of other programs in case I’m working on more than one show at once.
Andrew Mohr · 07/30/2020 at 12:32
Thank you for the awesome information!!
Am I right in thinking this? (for converting textures to be rendered in a 3D program)
– For 16 bit diffuse exr that is sRGB colorspace (how substance painter exports it) it should be
Utility-texture-sRGB>ACEScg
– For HDRIs (linear but with sRGB primary) it should be Utility-linear-sRGB>ACEScg
– For roughness, displacement etc, it should be Utility-raw>ACEScg
Also does anything actually happen to the texture if you convert from utility-raw to ACEScg?
Thanks again :)
toadstorm · 07/30/2020 at 12:44
Yep, that all looks correct to me. And I think your intuition is right that converting from Utility – Raw to ACEScg or any other space doesn’t really do anything to pixel values… it’s just sort of a “pass-through” transform. Better to be explicit about all your inputs with something as complicated as ACES!
Andrew Mohr · 07/30/2020 at 12:58
Ah that’s fair! thank you :D
Austin Wendenburg · 09/23/2020 at 14:09
Thank you so much for the comprehensive guide!
In regards to converting textures in a cop2 network…
Could you not just set up a few LUT’s and run your textures through the lookup node instead of through the vopnet ocio transform?
Just think it would save quite a few clicks. Thanks again!
Late to the Party · 10/12/2020 at 17:12
Is there an Idiot’s version to the “Idiots Guide to ACES”? Asking for a friend.
Viktor · 02/22/2021 at 05:42
Could you possibly share that sample scene ( box with the red / green side ) with a correct .exr render ?
I have ACES set up but I’m unsure about the result and when I replicated the scene my render is somewhere in-between the two examples you have here.
Thank you!
Viktor · 02/22/2021 at 05:52
Just another question – having a seemingly correct ACES setup, the color picker in maya behaves weird – a mid grey of 0.5 in the Output – sRGB color picker turns into 0.303 when color management is turned off which is weird. Any thoughts on this ?
manu · 03/24/2021 at 08:13
Hi, Anyone know how to convert textures from srgb to Aces?
cheers
Another manu · 05/06/2021 at 17:00
Thanks a lot for writing this post and the blog in general, it’s really useful.
Ben · 05/09/2021 at 19:26
Hope to know how to plot the CIE1931 chromaticity diagram, especially the color-filling approach…Thanks!
Richard · 12/09/2021 at 13:39
I’m just trying to comp exr linear footage (gh5 footage exported image seq exr from fcp) with my redshift AcesCg footage in Nuke. I tried a multitude of things but just can’t get my gh5 footage to look the same as in normal Nuke color management. So I think your other solution would make sense but how exactly would you do that? You mention the OCIO transform tool, would that be OCIOFileTransform node or the OCIOColorSpace node? if I use the later the Aces option are not available if I’m using the “Nuke” color management.. would this mean that I would need to make a custom config file? Thanks!!
toadstorm · 12/09/2021 at 14:18
If you want to use ACES at all in production, you’ll want to choose an OCIO configuration for Nuke to work with. Unfortunately, Redshift has taken the extremely silly step of implementing an OCIO 2.0 configuration that many other applications aren’t yet compatible with, including Nuke (unless it’s changed very recently), so it’s possible you might not get an absolutely perfect match, though you should get close. I don’t think Nuke supports ACES transforms with its built-in color management, so you’ll likely have to set the OCIO environment variable before launching Nuke.
Configure your environment so that Nuke is reading an OCIO profile containing ACES transforms, and then when loading in your footage, set your Read node colorspace to the correct input transform based on the input footage, and the view transform to the correct view transform for your show (probably sRGB). Make sure your project configuration is using ACEScg as the working space. Your Redshift renders should have the input colorspace set to ACEScg, assuming you’re writing EXRs. The gh5 footage, if it’s linear using sRGB primaries, should be set to read as “Utility – Linear – sRGB” or the equivalent.
Richard · 12/09/2021 at 17:33
Thanks for the quick reply! Well it’s almost working perfectly, I have Nuke in aces1.1 and my redshift footage looks good but my gh5 footage is still not the same. looks like the shadows are too dark. would this be due to the RRT S-curve you mention? how can I make it looks exactly the way it is in normal Nuke? thank you so much again
the_Olf · 01/15/2022 at 05:59
Great. Compact an everything relevant important included. Thank you.
Vanya · 04/06/2023 at 20:27
Hi and thank you for this fantastic article. You mentioned how data textures shouldn’t be converted to Aces but than user Andrew Mohr suggested using Utility-raw>ACEScg for data textures and you said that’s correct so since those are two opposing answers I am wondering which one is it?
Do you mess with data textures or not like previously stated?
Thanks
toadstorm · 05/14/2023 at 16:19
Sorry for the late reply; WordPress is bad about notifying me of new posts.
Data textures should be read as data, not color, so it’s important that they’re interpreted as raw. They should not be converted to ACEScg because they don’t represent color information at all. It might be different in other render engines, but without any additional context I’d say your user’s suggestion is probably incorrect.
Robin Brinkler · 03/07/2025 at 15:05
Thanks so much for this article Henry!
Regarding newer OCIO configs and Fusion:-
Perhaps others know a better approach than what I got working today. I found that prior advice online about OCIO transform settings for an ACES workflow that worked with the older OCIO config files doesn’t quite follow for the newer OCIO config files, once we get to the point of exporting to sRGB or Rec.709.
I was using a workflow of ACEScg in Houdini, exporting to EXR using the Color Space: ACEScg
After trying to export images / media from Fusion, using an OCIOColorSpace node before any Saver or other media output node, I found that the Output Space: Output – sRGB option (for example) was not available when using an OCIO config such as: cg-config-v2.2.0_aces-v1.3_ocio-v2.3. It doesn’t exist in the config file. I was only able to see that option by using an older ACES 1.2 config file. Any sRGB or Rec.709 options I tried with the OCIO v2.3 config file looked blown out in bright areas.
I then found there is a new ACESTransform node, which allows the following settings, for example:
ACES Version: ACES 1.3
Input Transform: ACEScg – CSC
Output Transform: sRGB
or
Output Transform: Rec.709
I’m not sure if this is the best approach, but the resulting JPG for example, looks quite similar to the image displayed in the viewer in Fusion when using the OCIO Display settings:
Source Space: ACEScg
Display: sRGB – Display
View: ACES 1.0 – SDR Video
Google’s Gemini says this about CSC:
CSC (Color Space Conversion):
In ACES 2, the term “CSC” is used to denote transforms that can be used as both Input Transforms (IDT) and general Color Space Conversion Transforms.
These transforms are used to convert between different color spaces, such as converting from ACEScg to sRGB for display.
For example, you might use a “CSC – ACEScg” input transform when importing footage into a compositing program, and then use an output transform to convert to a display color space like sRGB.
So I thought, perhaps I shouldn’t be applying an input transform, since Fusion is already using the OCIO config file defined in my Windows Environment Variables (cg-config-v2.2.0_aces-v1.3_ocio-v2.3.ocio).
If I don’t select an Input Transform (by selecting No Input Transform), then the resulting image looks quite saturated in comparison to the Input Transform: ACEScg – CSC.
The only alternative I found so far is to use the older ACES 1.2 OCIO config, which does show the Output Space options: Output – sRGB and Output – Rec.709 for example.
Robin Brinkler · 03/08/2025 at 06:00
Also, I found that when using the ACESTransform node in Fusion (where Fusion is picking up the OCIO config from the Windows Environment Variable) with the newer OCIO config (Aces 1.3, OCIO profile 2.3 – cg-config-v2.2.0_aces-v1.3_ocio-v2.3.ocio for example), there is a marked difference in highlights in fog volumes rendered with Karma XPU.
Some “vegetation” / thin vines showed as a stark outline in the fog, and generally there were some brightness differences in isolated areas.
Otherwise, the images looked basically identical to the results from using the Fusion OCIOColorSpace node with the older Aces 1.2 OCIO config found here:
https://github.com/colour-science/OpenColorIO-Configs/blob/master/aces_1.2/config.ocio
Robin Brinkler · 03/08/2025 at 09:19
An alternative that seems to work is using the OCIODisplay node in Fusion, set to:
Source Space: ACEScg
Display: sRGB – Display
View: ACES 1.0 – SDR Video
And then for example using a Saver node set to JPG, with the Color Space Type set to default (Keep), and the Output Gamma Space set to default (Keep).
The resulting image is only slightly brighter than the one shown in the Fusion viewport, where the viewport is using OCIO Display settings:
Source Space: ACEScg
Display: sRGB – Display
View: ACES 1.0 – SDR Video
Where if Fusion’s working color space is ACEScg.
If any of this is useful to anyone perhaps I can condense the findings and make a final post, so feel free to eventually delete my ramblings here! :)
Other pages and discussions on this topic:
https://opencolorio.readthedocs.io/en/latest/configurations/aces_studio.html
“Please note that with OCIO v2 we are trying to be more rigorous about what constitutes a “color space”. For this reason, the new configs do not bake view transforms or looks into the display color spaces. Therefore, it is necessary to use a DisplayViewTransform rather than a ColorSpaceTransform if you want to bake in an ACES Output Transform. This is not only more rigorous from a color management point of view, it also helps clarify to end-users the important role of a view transform in the process. Baking in a view transform is a fundamentally different process than just converting between color space encodings, and it should be perceived as such by users.”
https://github.com/AcademySoftwareFoundation/OpenColorIO/issues/1369
https://community.foundry.com/discuss/topic/161098/ocio-v2-and-aces-1-3-discussion
https://www.reddit.com/r/NukeVFX/comments/10t4yyx/aces_13_and_displayoutput_transforms/
https://community.acescentral.com/t/questions-proper-workflow-in-fusion-studio-using-aces-1-3-and-ociov2/4837/16
Robin Brinkler · 03/08/2025 at 09:52
*wishing I had found this before spamming this page*
Using Fusion Studio 19, with the Windows Environment Variable set to:
cg-config-v2.2.0_aces_v1.3_ocio-v2.3.ocio
I compared the results of exporting a JPG using the old ACES 1.2 OCIO config, here:
https://github.com/colour-science/OpenColorIO-Configs/blob/master/aces_1.2/config.ocio
Using these settings on an OCIOColorSpace node:
Source Space: ACES – ACEScg
Output Space: Output – sRGB
Look: None
… with an image exported from Fusion 19 using the same Windows Environment Variable pointing to the same cg-config-v2.2.0_aces_v1.3_ocio-v2.3.ocio config
Then using an OCIODisplay node in Fusion, set to:
Source Space: ACEScg
Display: sRGB – Display
View: ACES 1.0 – SDR Video
And then for example using a Saver node set to JPG, with the Color Space Type set to default (Keep), and the Output Gamma Space set to default (Keep).
So, using the OCIODisplay node with the above setting yields an image that appears to be identical to one exported using the old tried and trusted ACES 1.2 config with an OCIOColorSpace node set to Source Space: ACEScg and Output Space: Output – sRGB as many tutorials advised in the past.
Using the ACESTransform node set to ACES Version: ACES 1.3, Input Transform: ACEScg – CSC, Output Transform: sRGB yields an image where some bright areas disappear from the image.
toadstorm · 03/09/2025 at 19:17
I need to go through all this and do an updated guide at some point in the future. The changing transform names are definitely confusing. This is my first time hearing about the ACESTransform node. Thanks for your contributions, I’ll dig through your notes and see if I can replicate what you’re seeing.
Convert textures to ACES – timvanhelsdingen.com · 03/30/2020 at 04:00
[…] In this video I demo my HDA that converts textures to ACES color space, as seen in Toadstorms guide […]
Our 45 Favorite Houdini Tutorials for Aspiring VFX Artists · 10/20/2021 at 10:11
[…] […]
Why work in ACES? – Masonry Studios · 11/10/2022 at 19:35
[…] ACES? The short answer is, why not? And the idiot’s answer is beautifully written in “An Idiot’s Guide to ACES” by toadstorm […]
Color Management – Part I – Jian-Yu · 07/25/2024 at 14:57
[…] An Idiot’s Guide to ACES […]
Color Management in VFX – Part I – Jian-Yu · 07/25/2024 at 15:07
[…] An Idiot’s Guide to ACES […]